PAcee Hub

学习 笔记


  • 首页

  • 标签

  • 分类

SpringSecurity11-Social-QQ登录(中)

发表于 2020-01-14 | 分类于 springsecurity

在上一节,我们的SpringSocialQQ登录成功跑起来了,跳到QQ登录的网站上,但是报错了,我们来一点一点解决问题,直到成功登录

Redirect Url Illegal

Redirect Url是什么

1578906244303

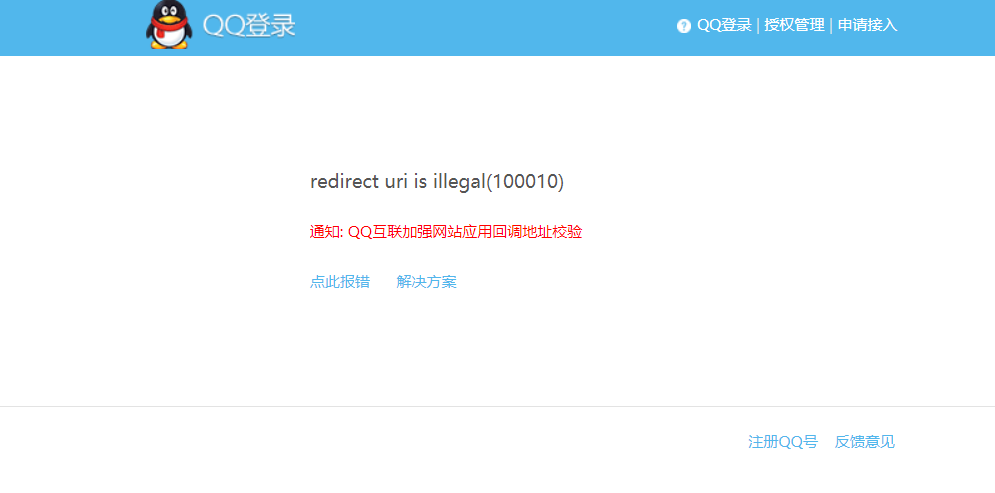
上一节我们开发完,来到这个页面,首先我们配合之前的流程图分析一下完整的QQ登录流程:

1578555140255

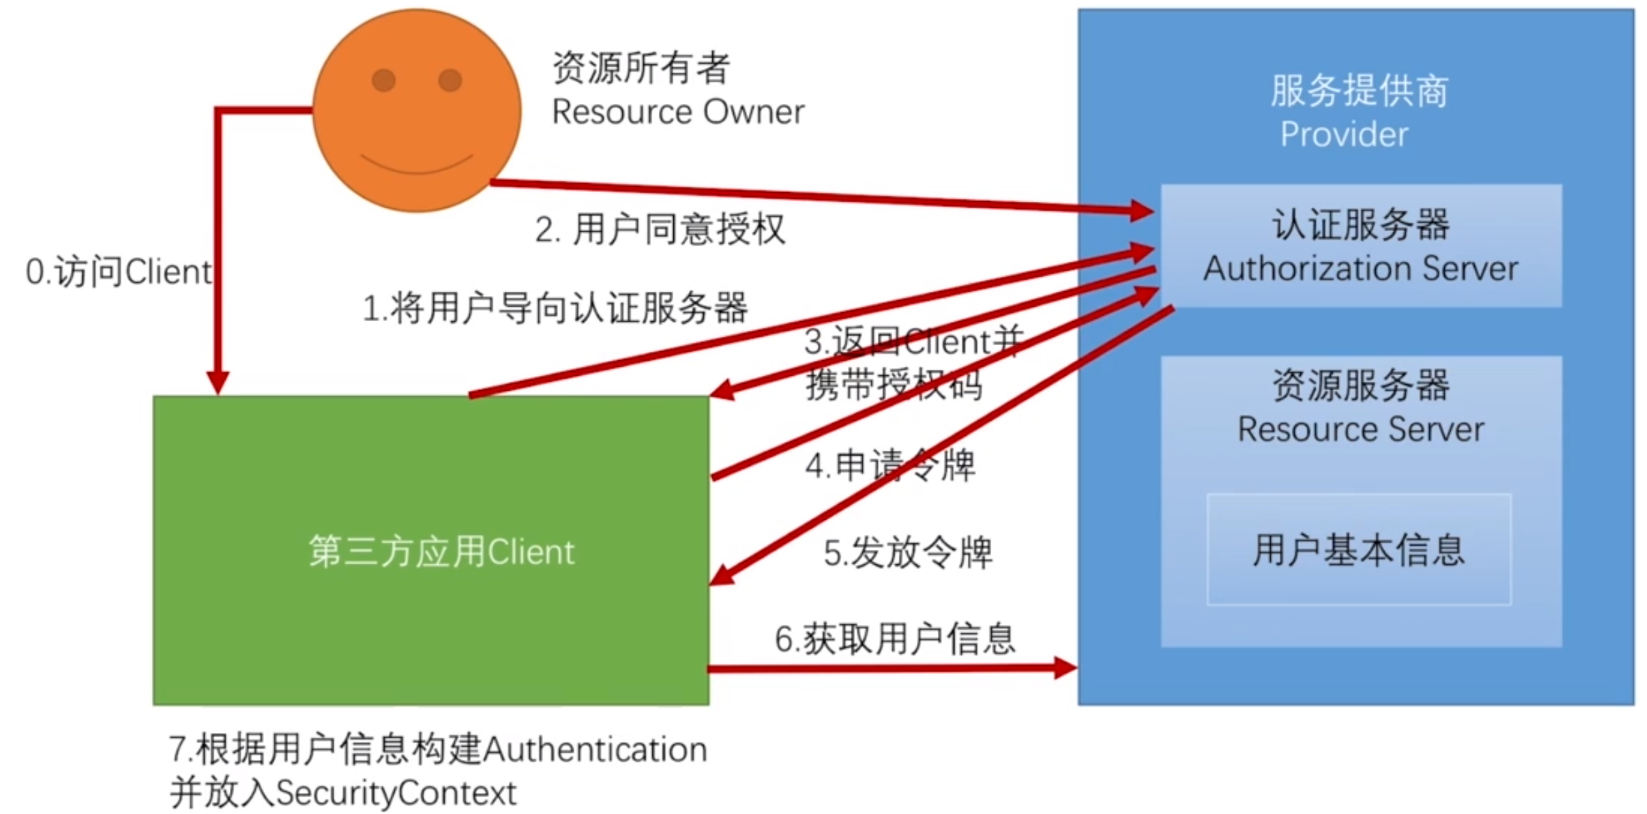
用户点击QQ登录 ——》用户扫码或者账号密码登录 ——》登录成功后QQ调用应用回调地址,将授权码给我们应用 ——》应用拿着授权码请求QQ获取accesstoken——》换到accesstoken后再根据它获取openId——》然后通过openId获取用户信息

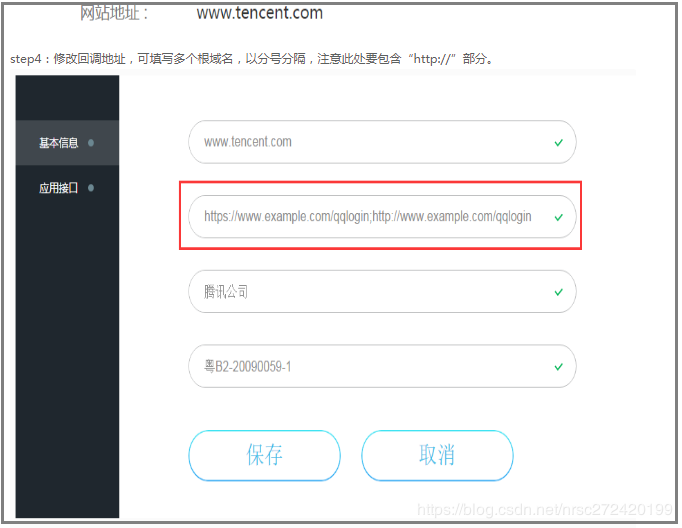
这里Redirect Url就是回调地址

同时我们还要明确redirect uri不是随意生成的,而是在我们的系统在QQ上进行注册时需要填写的必填信息之一,它的填写有一定的规则,可参考QQ互联官网。这里要注意,官网上明确说明了域名要包含http://部分。
在这里插入图片描述

阅读全文 »

SpringSecurity10-Social-QQ登录(上)

发表于 2020-01-13 | 分类于 springsecurity

这一节,我们要研究SpringBoot2+SpringSecuritySocial来实现第三方登录-QQ登录

开发QQ登录思路

我们先看上一章的图

img

我们最后需要Connection,即QQ登录后的用户信息,想要Connection,就需要ConnectionFactory,想要ConnectionFactory,就需要我们自己实现APIAdapter和ServiceProvider,对于ServiceProvider来说,我们需要自己实现Api,而对于OAuth2Operations可以使用它默认实现的OAuth2Template。

所以,我们的开发流程为:

  1. 自己实现Api
  2. 使用默认的OAuth2Operations,从而实现ServiceProvider
  3. 实现ApiAdapter,从而实现ConnectionFactory
  4. 在DB建表,使用默认的UsersConnectionRepository
  5. 这样就可以在容器中通过ConnectionFactory注入Connection使用了

实现QQ登录

准备工作

https://wiki.connect.qq.com/,到QQ互联官网查看文档,了解QQ登录需要哪些信息,如何获取这些信息,调用哪些接口,传入什么参数,返回什么结果,比较重要的有:

  • 获取用户信息
  • 获取OpenID
  • 获取Access_Token
    阅读全文 »

SpringSecurity09-Social-基本原理

发表于 2020-01-09 | 分类于 springsecurity

我们之前学习了SpringSecurity的基本使用方式以及原理流程。接下来我们学习SpringSecuritySocial,在第一节就介绍过,这个技术是在SpringSecurity基础上添加的,用来处理第三方登录的认证请求。

Oauth协议介绍

这里为什么要先将Oauth协议呢?Oauth不是后面才要学到的吗?第一节介绍SpringSecurity Oauth是用于APP安全认证的。

其实Social和SpringSecurity Oauth都是基于Oauth协议开发的,所以我们学习之前要了解Oauth协议是什么?

问题提出

比如我们要开发一个微信助手,用来美化自拍,需要用户微信中的自拍数据,那要怎么办呢?

让用户直接把用户名密码给我们吗?这肯定不现实,因为微信有更多的隐私聊天记录,直接登录肯定会看到。

Oauth协议解决问题

Oauth协议就是的出现就是为了解决这类问题的

img

  • 用户不把密码告诉我们,而是给我们一个令牌,比如Token
  • 我们拿着令牌去找微信要数据
  • 微信根据令牌,把对应的数据传给我们,而不是所有数据
    阅读全文 »

SpringSecurity08-短信验证码

发表于 2020-01-08 | 分类于 springsecurity

本篇文章我们研究Spring Security开发基于表单的登录的最后一块内容,基于短信验证码的接口开发。 前面的文章我们讲解了基于图片验证码的校验,有兴趣的同学可以翻看一下。

这篇文章除了讲解短信验证码的开发之外,我们还会对之前的代码做一次重构,我们希望短信验证码和图片验证码的逻辑的公共部分可以抽离出来。

开发短信验证码接口

实现思路

我们的代码类似于图片验证校验,进行实现

首先肯定要写一个生成短信的类,然后将这个短信通过接口发送出去(这个接口可以有很多实现,因为有不同的短信服务提供商)。

既然有短信,肯定有一个短信的封装类,还需要配置类,配置短信验证码长度,过期时间等。

创建短信验证码信息封装类

因为短信和图片成员变量类似,所以集体抽象出来为ValidateCode,并使两个封装类继承此类

短信验证码直接调用父类构造方法

图片验证码新增一个图片变量

1
2
3
4
5
6
7
8
9
10
public class SmsCode extends ValidateCode {

public SmsCode(String code, int expireTime) {
super(code, expireTime);
}

public SmsCode(String code, LocalDateTime expireTime) {
super(code, expireTime);
}
}
阅读全文 »

SpringSecurity07-记住我

发表于 2020-01-08 | 分类于 springsecurity

记住我基本原理

记住我这个功能应该都不陌生,就是保存用户登录信息

img

在SpringSecurity中实现原理是:

  • 第一次,浏览器发出认证请求,由UsernamePassword拦截器认证后,会走到RememberMeService类
  • RememberMeService使用TokenRepository做了两件事
    • 将用户信息以Token对象保存到数据库中(Mysql,Redis等等)
    • 将Token放到Cookie中返回给浏览器
  • 第二次浏览器请求后,会被RememberMeAuthenticationFilter拦截,这个拦截器会当前面一系列绿色拦截器拦截过后才会拦截
  • RememberMeAuthenticationFilter请求RemenberMeService,将请求信息传递给他
  • RememberMeService先读取Cookie中的Token然后使用TokenRepository向DB查找Token
    • 如果查到了调用UserDetailsService获取用户信息
    • 没查到则抛出异常,让用户去登录页
      阅读全文 »

SpringSecurity06-图片验证码

发表于 2020-01-08 | 分类于 springsecurity

这一节,我们要做一个登录图形验证码校验的功能,为了实现可配置,我们将使用大量接口以及配置类,极大程度降低耦合性,做一个可重用的功能

生成图形验证码接口

创建验证码信息封装类

1
2
3
4
5
6
7
8
9
10
11
12
13
14
15
16
17
18
19
20
21
22
23
24
25
26
27
28
29
30
31
32
33
34
35
36
37
38
39
40
41
42
43
44
45
46
47
48
49
public class ImageCode {

private BufferedImage image;

private String code;

private LocalDateTime expireTime;

public ImageCode(BufferedImage image, String code, int expireIn) {
this.image = image;
this.code = code;
this.expireTime = LocalDateTime.now().plusSeconds(expireIn);
}

public ImageCode(BufferedImage image, String code, LocalDateTime expireTime) {
this.image = image;
this.code = code;
this.expireTime = expireTime;
}

public boolean isExpired() {
return LocalDateTime.now().isAfter(expireTime);
}

public BufferedImage getImage() {
return image;
}

public void setImage(BufferedImage image) {
this.image = image;
}

public String getCode() {
return code;
}

public void setCode(String code) {
this.code = code;
}

public LocalDateTime getExpireTime() {
return expireTime;
}

public void setExpireTime(LocalDateTime expireTime) {
this.expireTime = expireTime;
}

}
阅读全文 »

SpringSecurity05-认证流程源码分析

发表于 2020-01-07 | 分类于 springsecurity

通过之前的学习,我们发现不管对于自定义认证逻辑还是流程,都是对SpringSecurity提供的接口进行实现,比如UserDetailsService,UserDetails等等,都是一些碎片化的东西,这里我们就需要研究SpringSecurity的源码,看看它是如何把这些碎片拼接成一个完整的图片的。

认证处理流程

还记得之前那张图

1578360692713

为SpringSecurity过滤器链路,这里我们主要分析的是UsernamePasswordAuthenticationFilter,在这个过滤器里都做了什么,涉及了哪些类,这个过滤器也是认证处理的主要类。

1578364571670

我们根据这张图,来进行源码分析查看,并最后做出总结,一开始我们只需简单查看了解这个流程即可。

阅读全文 »

SpringSecurity04-自定义用户认证流程

发表于 2020-01-06 | 分类于 springsecurity

上一节我们简单介绍了如何自定义用户认证策略,包括

  • 设置用户名密码,权限
  • 设置用户过期,密码过期等策略
  • 设置用户密码的加密与加密方式

这一节我们研究如何自定义用户认证的流程,一个是流程一个是策略,流程包括:

  • 自定义登录页面:之前都是使用SpringSecurity默认的表单页面,这里我们要个性化一个登录页
  • 自定义登录成功后处理:有时候我们希望登录成功处理后不只是简单跳转到首页,我们还希望给用户颁发优惠券等等。
  • 自定义登录失败后处理:当用户登录失败后,我们有时候也希望记录日志等信息,而不是像上一章节中直接弹出登录错误的提示。

自定义登录页

简单实现

1.创建一个html登录页

1
2
3
4
5
6
7
8
9
10
11
12
13
14
15
16
17
18
19
20
21
22
23
24
25
26
<!DOCTYPE html>
<html lang="en">
<head>
<meta charset="UTF-8">
<title>登录</title>
</head>
<body>
<h2>标准登录页面</h2>
<h3>表单登录</h3>
<form action="/authentication/form" method="post">
<table>
<tr>
<td>用户名:</td>
<td><input type="text" name="username"></td>
</tr>
<tr>
<td>密码:</td>
<td><input type="password" name="password"></td>
</tr>
<tr>
<td colspan="2"><button type="submit">登录</button></td>
</tr>
</table>
</form>
</body>
</html>
阅读全文 »

SpringSecurity03-自定义用户认证逻辑

发表于 2020-01-06 | 分类于 springsecurity

在上一节,我们使用的都是默认的用户名密码进行登录,这一节我们将研究如何自定义用户名及密码,进行自定义的用户认证逻辑。

自定义用户认证逻辑涉及三个方面:

  • 处理用户信息获取逻辑
  • 处理用户校验逻辑
  • 处理密码加密解密

用户信息获取逻辑

表示我们获取用户时可以从mysql、redis、ldap中获取用户的信息,而不再使用SpringSecurity默认提供的user信息。

实现起来非常简单,因为SpringSecurity已经预留了相应的接口,我们只需实现它重新方法即可。

UserDetailsService

1
2
3
4
5
6
7
8
9
10
11
12
13
14
15
16
17
18
19
20
public interface UserDetailsService {
// ~ Methods
// ========================================================================================================

/**
* Locates the user based on the username. In the actual implementation, the search
* may possibly be case sensitive, or case insensitive depending on how the
* implementation instance is configured. In this case, the <code>UserDetails</code>
* object that comes back may have a username that is of a different case than what
* was actually requested..
*
* @param username the username identifying the user whose data is required.
*
* @return a fully populated user record (never <code>null</code>)
*
* @throws UsernameNotFoundException if the user could not be found or the user has no
* GrantedAuthority
*/
UserDetails loadUserByUsername(String username) throws UsernameNotFoundException;
}
阅读全文 »

SpringSecurity02-基本原理

发表于 2020-01-06 | 分类于 springsecurity

在上一节中,我们发现SpringBoot会自动配置Security,让我们跳转到表单登录页面,输入默认的用户名和随机生成的密码。

其实在springboot1.x版本中,并不是跳转到表单登录页,而是弹出一个对话框,在对话框里输入信息,我们可以修改代码尝试一下。

两种认证方式

首先我们在browser模块创建一个BrowserSecurityConfig类

1
2
3
4
5
6
7
8
9
10
11
12
13
14
@Configuration
public class BrowserSecurityConfig extends WebSecurityConfigurerAdapter {

@Override
protected void configure(HttpSecurity http) throws Exception {
// 以http方式认证 springboot1.x时默认
// 以form表单方式认证 springboot2.x默认
http.httpBasic()
.and()
.authorizeRequests() // 下面是认证信息
.anyRequest() // 所有请求
.authenticated(); // 都需要认证
}
}

这个类继承了WebSecurityConfigurerAdapter,安全配置适配器类,并重写configure方法,这里configure有三种重载方法,我们这里先使用Http形式的。

通过代码很好理解,即通过一系列配置,使用了httpBasic的方式进行身份认证的拦截。

阅读全文 »
< 123…8 >
PAcee

PAcee

学习 笔记

76 日志
6 分类
7 标签
© 2020 PAcee