SpringSecurity19-OAuth-重构三种登录

为何/如何重构表单登录

首先,我们需要明确一点,为什么我们要重构之前的表单登录?

因为对于App来说,没有Cookie,所以不能使用Cookie+Session的方式对登录用户信息存储,就必须使用Token,然后SpringSecurityOAuth就是封装了一系列操作,最后返回Token,但是它只有四种授权模式,并没有直接表单登录,或者短信登录的方式,所以我们需要进行一些改变,来通过SpringSecurityOAuth帮我们实现Token的生成发放,最后实现App的登录以及登录状态保存。

通过上一节的学习,我们大致了解了SpringSecurityOAuth生成Token的流程,如下图

1579419496431

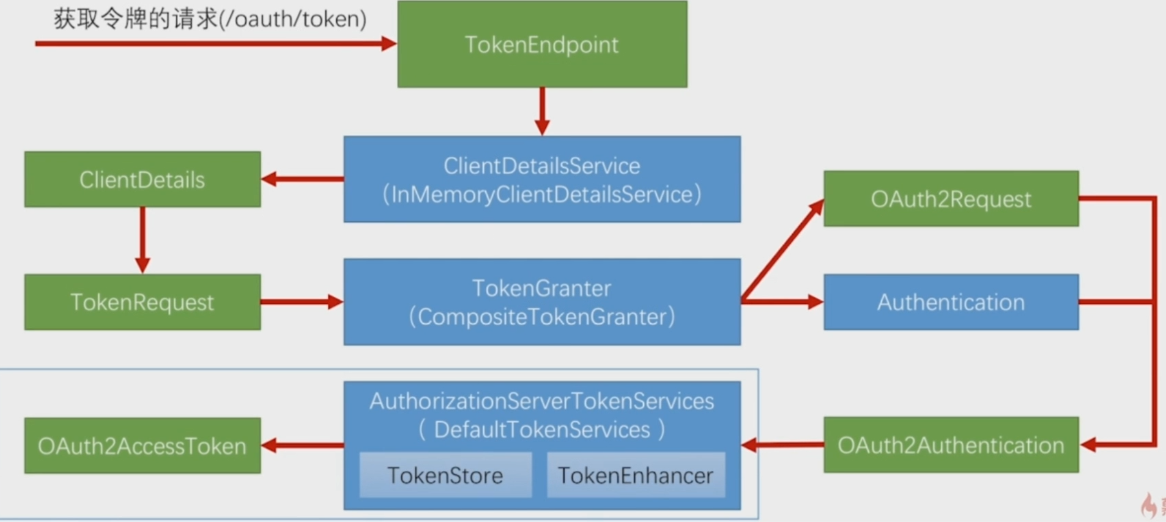
那么,我们要用的逻辑是哪块呢?就是最下面AuthorizationServerTokenServices生成Token的逻辑,所以我们的实现流程就如下图:

在这里插入图片描述

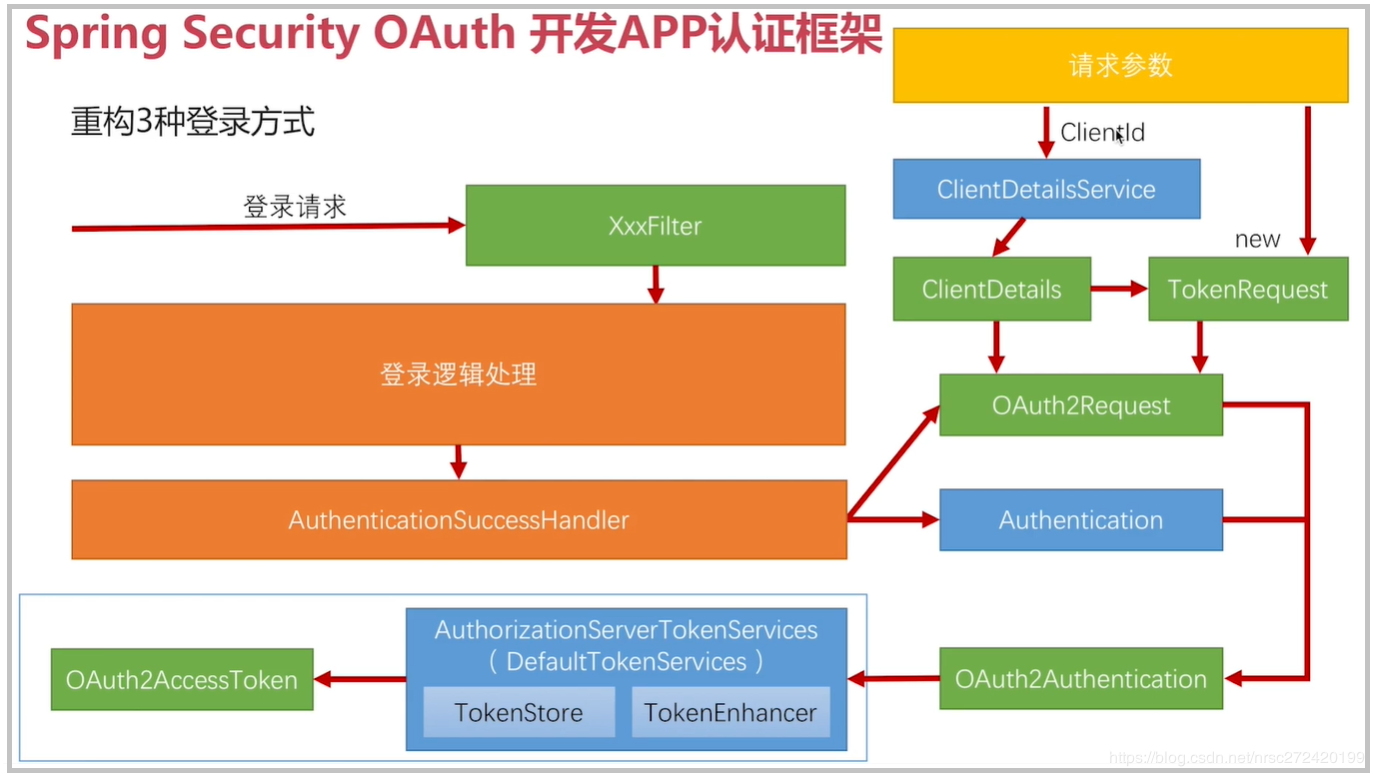
首先我们之前的认证成功处理器的处理就是直接将Authorization作为json形式返回,所以我们是有Authorization这个对象的。

那么我们的目光就聚焦在OAuth2Request上了,只要有了他就能调用DefaultTokenServices生成Token,那么如何创建一个OAuth2Request对象呢?

通过上节源码可知,它是由ClientDetailsTokenRequest生成的

  • ClientDetails是由请求参数ClientId作为参数,调用ClientDetailsService生成的
  • TokenRequest就更简单了,是直接new出来的,通过请求的几个参数和ClientDetails

总结,使用SpringSecurity OAuth重构表单登录的思路有三点:

  • 代码写在AuthorizationSuccessHandler成功处理器里
  • 最终目标是构建出OAuth2Request对象
  • 构建对象需要从参数ClientId入手

    SpringSecurityOAuth重构表单登录

认证成功处理器

1
2
3
4
5
6
7
8
9
10
11
12
13
14
15
16
17
18
19
20
21
22
23
24
25
26
27
28
29
30
31
32
33
34
35
36
37
38
39
40
41
42
43
44
45
46
47
48
49
50
51
52
53
54
55
56
57
58
59
60
61
62
63
64
65
66
67
68
69
70
71
72
73
74
75
76
77
78
79
80
81
82
83
84
85
@Component
public class MyAuthenticationSuccessHandler extends SimpleUrlAuthenticationSuccessHandler {

@Autowired
private ObjectMapper objectMapper;

@Autowired
private ClientDetailsService clientDetailsService;
@Autowired
private AuthorizationServerTokenServices authorizationServerTokenServices;

@Override
public void onAuthenticationSuccess(HttpServletRequest request,
HttpServletResponse response,
Authentication authentication)
throws IOException, ServletException {

//请求头的Authorization里存放了ClientId和ClientSecret
//从请求头里获取Authorization信息可参考BasicAuthenticationFilter类
String header = request.getHeader("Authorization");

if (header == null || !header.startsWith("Basic ")) {
throw new UnapprovedClientAuthenticationException("请求头中无client信息");
}

String[] tokens = extractAndDecodeHeader(header, request);

// 第一个为clientId 第二个为clientSecret
String clientId = tokens[0];
String clientSecret = tokens[1];

// 根据clientId获取clientDetails
ClientDetails clientDetails = clientDetailsService.loadClientByClientId(clientId);

// 对获取到的clientDetails进行校验
if (clientDetails == null) {
throw new UnapprovedClientAuthenticationException("clientId对应的配置信息不存在:" + clientId);
} else if (!StringUtils.equals(clientDetails.getClientSecret(), clientSecret)) {
throw new UnapprovedClientAuthenticationException("clientSecret不匹配:" + clientId);
}

// 根据clientDetails获取TokenRequest
// 1- 请求参数的map,用来获取Authorization,因为已经获得所以传空的
// 4- grantType,因为是自定义的 所以随便传一个
TokenRequest tokenRequest = new TokenRequest(MapUtils.EMPTY_MAP, clientId, clientDetails.getScope(), "custom");

// 获取OAuth2Request对象
OAuth2Request oAuth2Request = tokenRequest.createOAuth2Request(clientDetails);

// 获取Token
OAuth2Authentication oAuth2Authentication = new OAuth2Authentication(oAuth2Request, authentication);
OAuth2AccessToken accessToken = authorizationServerTokenServices.createAccessToken(oAuth2Authentication);


// 返回Json数据 返回Token
response.setContentType("application/json;charset=UTF-8");
response.getWriter().write(objectMapper.writeValueAsString(accessToken));
}

/**
* 从header获取Authentication信息 --- 》 clientId和clientSecret
* @param header
* @param request
* @return
* @throws IOException
*/
private String[] extractAndDecodeHeader(String header, HttpServletRequest request) throws IOException {

byte[] base64Token = header.substring(6).getBytes("UTF-8");
byte[] decoded;
try {
decoded = Base64.decode(base64Token);
} catch (IllegalArgumentException e) {
throw new BadCredentialsException("Failed to decode basic authentication token");
}
String token = new String(decoded, "UTF-8");
int delim = token.indexOf(":");

if (delim == -1) {
throw new BadCredentialsException("Invalid basic authentication token");
}
return new String[]{token.substring(0, delim), token.substring(delim + 1)};
}

}

app模块加入安全配置

这里要加在资源服务器上配置,因为资源服务器才是需要安全认证的

1
2
3
4
5
6
7
8
9
10
11
12
13
14
15
16
17
18
19
20
21
22
23
24
25
26
27
28
29
30
31
32
33
34
35
36
37
38
39
@Configuration
@EnableResourceServer
public class ResourcesServerConfig extends ResourceServerConfigurerAdapter {

@Autowired
private SecurityProperties properties;
@Autowired
private MyAuthenticationSuccessHandler successHandler;
@Autowired
private MyAuthenticationFailHandler failHandler;

@Override
public void configure(HttpSecurity http) throws Exception {

http.formLogin() // 表单配置
.loginPage("/authentication/require") // 自定义登录页
.loginProcessingUrl("/authentication/form") // url映射,post表单的url交给表单拦截器处理
.successHandler(successHandler)
.failureHandler(failHandler)
.and()
.authorizeRequests() // 下面是认证信息
.antMatchers(
"/authentication/require",
"/authentication/mobile",
"/code/*",
properties.getBrowser().getLoginPage(),
properties.getBrowser().getSignupPage(),
"/social/user",
"/user/regist",
"/session/invalid"
)
.permitAll() // 匹配请求过滤
.anyRequest() // 所有请求
.authenticated() // 都需要认证
.and()
.csrf().disable()// 取消csrf安全防护机制
;
}
}

这里复制了之前的browser模块配置,去掉了一些,保留了有用的

启动测试

使用Talend API插件,Postman也可以

1579423433327

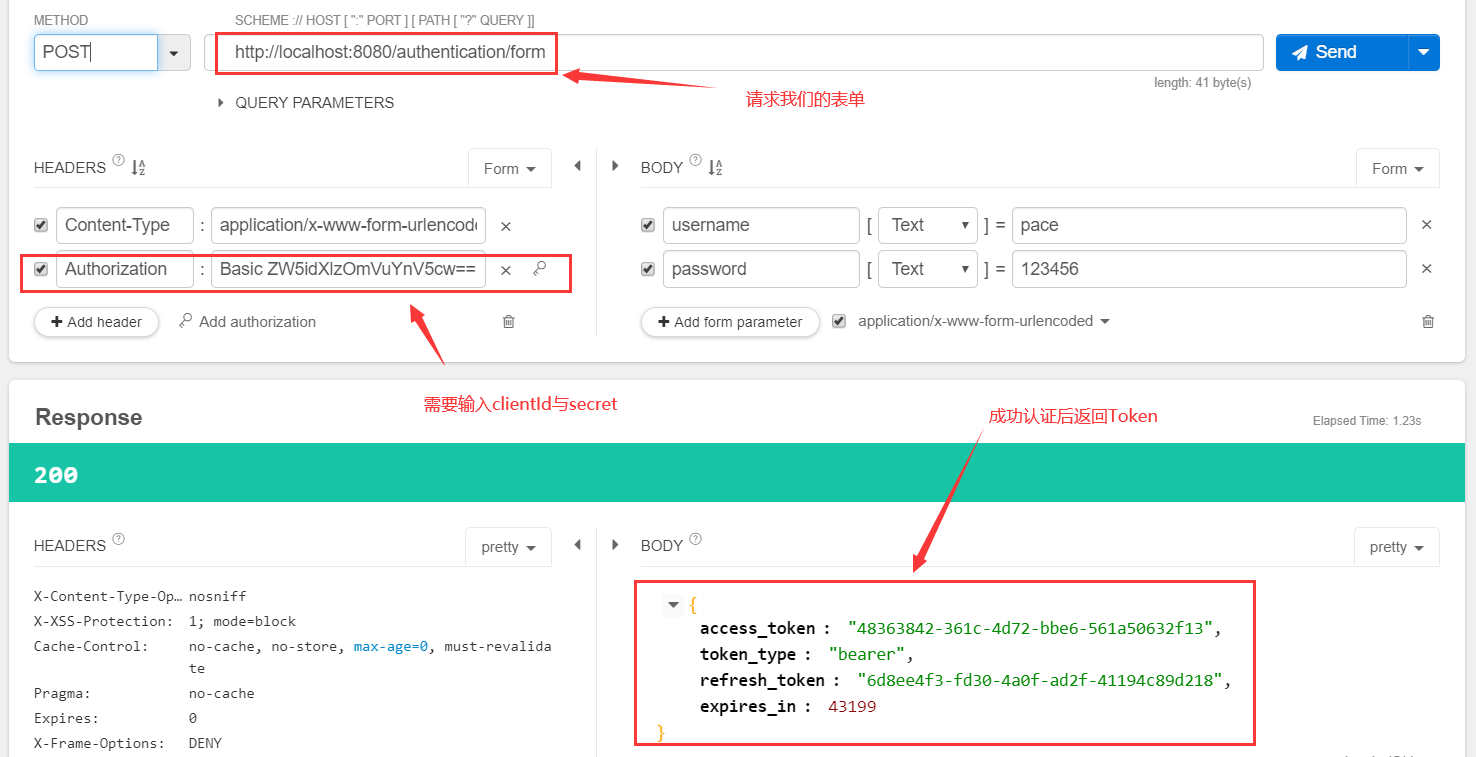
请求后成功返回AccessToken,接着我们使用这个Token去资源服务器请求

1579423477088

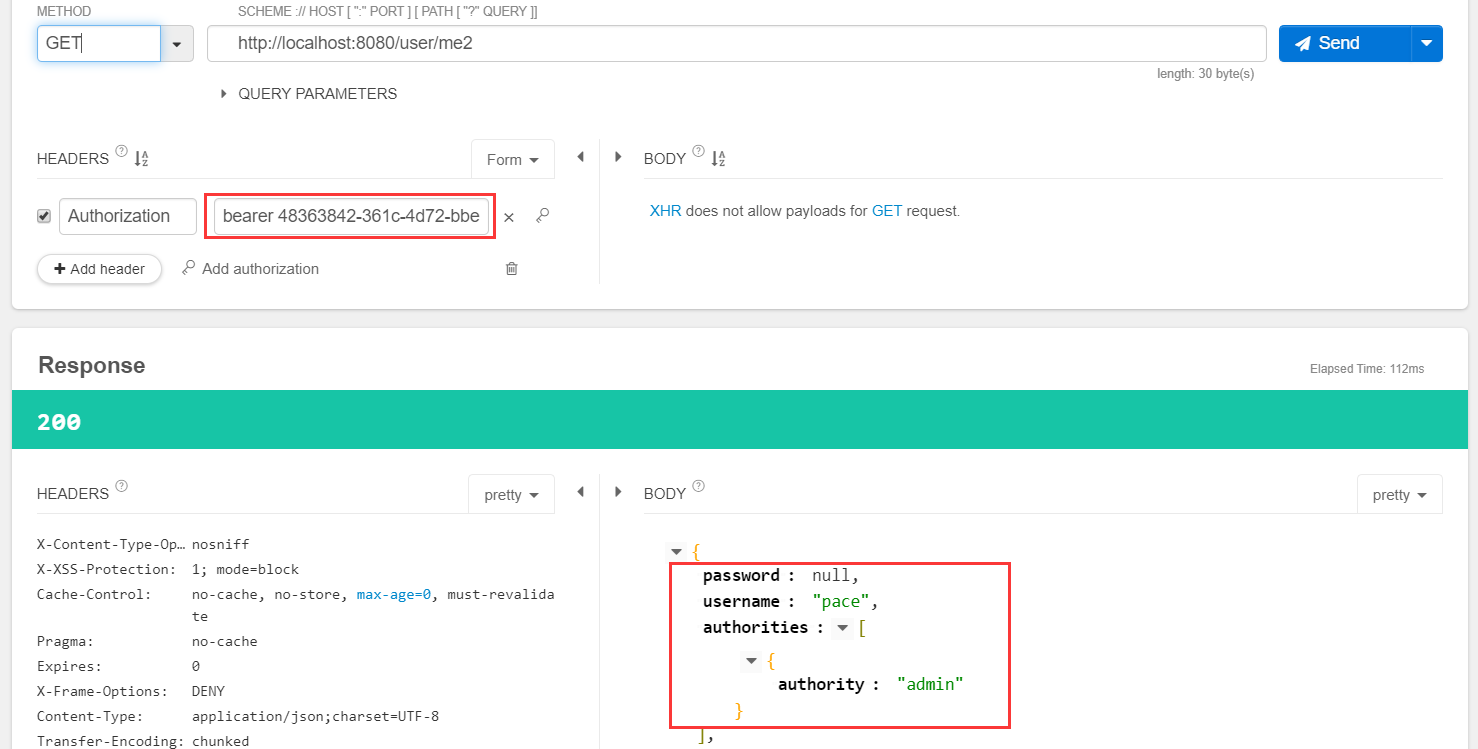
正确返回,说明我们使用SpringSecurityOAuth重构表单登录成功

SpringSecurityOAuth重构短信登录

这里简单说一下为什么要重构短信验证,之前我们将短信的校验码是保存在Session中的,但是App没有使用Session,所以需要重构

在这里插入图片描述

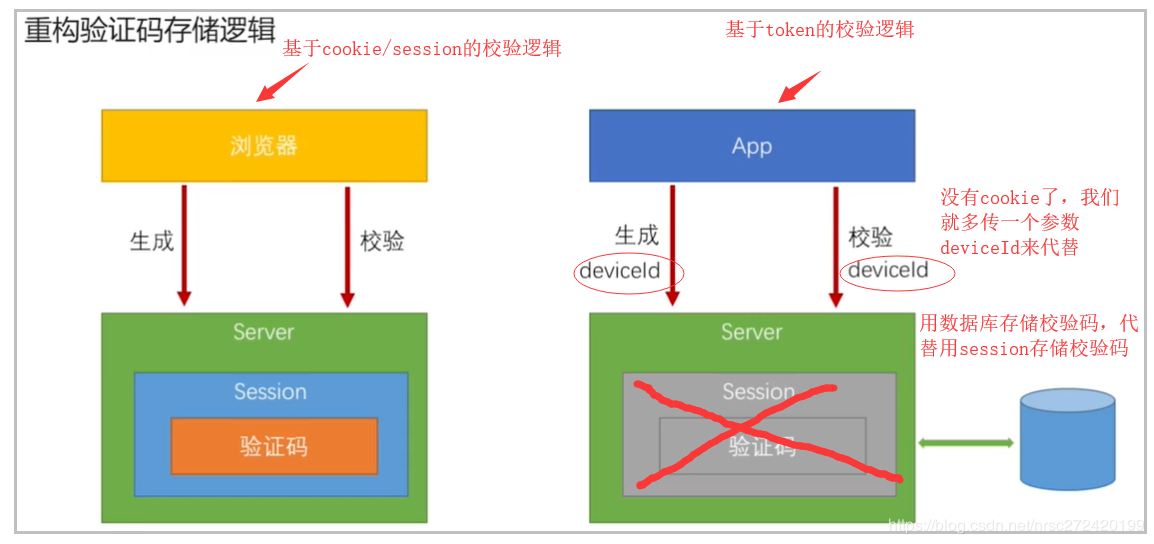
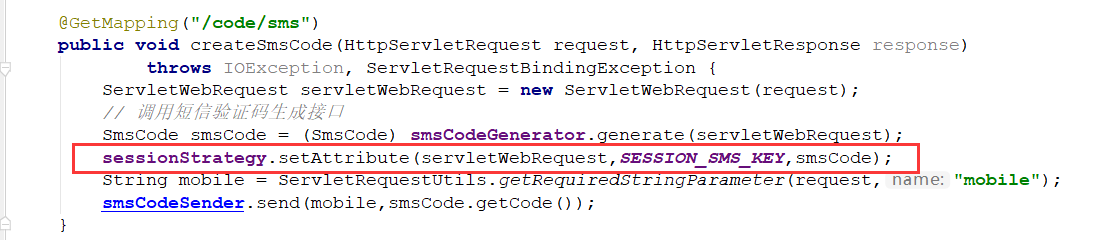
重构方式也很简单,就是之前在代码中所有使用sessionStrategy进行保存,获取,移除验证码的操作都改为数据库读写操作。比如下图这行代码:

1579424812865

因为实现比较简单,并且对我们之前写的认证成功处理器返回Token没有任何修改,就不再做演示了。

SpringSecurityOAuth重构第三方登录

TODO

可以看下这两篇博客:使用简化模式重构第三方登录使用授权码模式重构第三方登录