在上一节,我们的SpringSocialQQ登录成功跑起来了,跳到QQ登录的网站上,但是报错了,我们来一点一点解决问题,直到成功登录
Redirect Url Illegal
Redirect Url是什么
上一节我们开发完,来到这个页面,首先我们配合之前的流程图分析一下完整的QQ登录流程:
用户点击QQ登录 ——》用户扫码或者账号密码登录 ——》登录成功后QQ调用应用回调地址,将授权码给我们应用 ——》应用拿着授权码请求QQ获取accesstoken——》换到accesstoken后再根据它获取openId——》然后通过openId获取用户信息
这里Redirect Url就是回调地址
同时我们还要明确redirect uri不是随意生成的,而是在我们的系统在QQ上进行注册时需要填写的必填信息之一,它的填写有一定的规则,可参考QQ互联官网。这里要注意,官网上明确说明了域名要包含http://部分。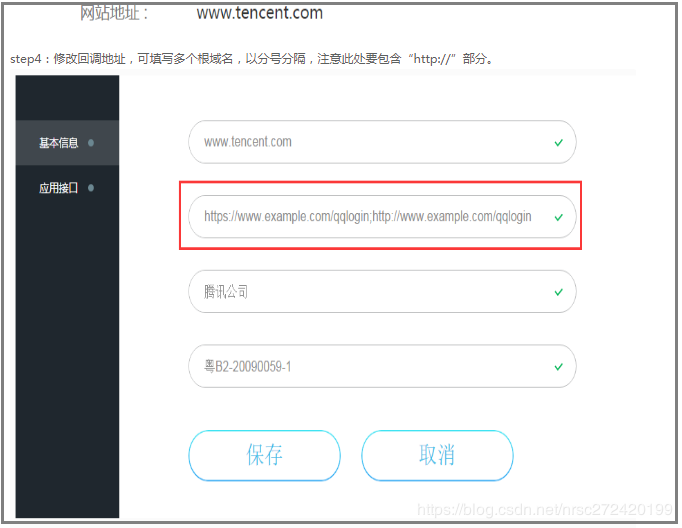
Redirect Url Illegal的原因
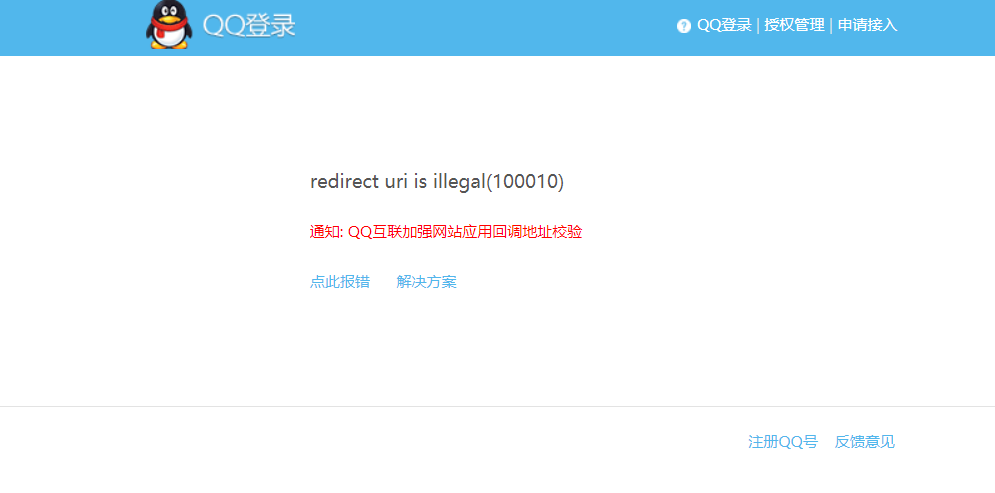
为什么我们会出现这个问题呢?我们先看看请求路径
https://graph.qq.com/oauth2.0/show?which=error&display=pc&error=100010&client_id=100550231&response_type=code&redirect_uri=http%3A%2F%2Flocalhost%3A8080%2Fauth%2Fqq&state=8f3b0533-e5a7-4dfe-a2b8-94f0119b0ad2
这里重要的参数就是:redirect_uri=http%3A%2F%2Flocalhost%3A8080%2Fauth%2Fqq
其实可以很容易地猜出来就是localhost:8080/auth/qq,这肯定不可能是我们在QQ互联上配置的redirect_uri,因此当我们的项目拿着这个redirect_uri去请求QQ的接口时就报出了redirect uri is illegal(100010)的错误。
同时我们也可以看出redirect_uri在我们项目中的生成规则是:
1 | IP+端口号(或者域名+端口)+/auth/qq |
其中/auth和/qq我们在上篇文章中讲过它俩分别由SocialAuthenticationFilter和providerId控制。
Redirect Url Illegal的解决方式

这里我在QQ互联上配置的地址和回调域如上图,所以我们就要把项目中的配置对应的进行修改
修改访问域名和端口
因为我们是本机测试,所以只需修改host即可
1 | 127.0.0.1 www.pinzhi365.com |
端口修改:
1 | =80 |
这里为什么改80就不解释了
修改SocialFilter拦截的路径为qqLogin
我们上一节的最后了解到,SocialAuthenticationFilter的默认拦截路径为/auth,如果我们想修改他,应该怎么办呢?SocialAuthenticationFilter是由SpringSocialConfigurer构建的,所以我们进源码看看
1 |
|
这里我们可以看到SpringSocialConfigurer将SpringSocialConfigurer添加到Security拦截器链上之前,做了一件事postProcess(),所以我们重新这个方法即可,后置处理,将Filter的拦截路径修改一下
创建MySpringSocialConfigurer
1 | public class MySpringSocialConfigurer extends SpringSocialConfigurer { |
修改SocialConfig
1 |
|
这里我是把拦截路径设置成可配置的,这里要在application.properties中配置一下
1 | =/qqLogin |
修改providerId
因为ProviderId之前写在QQProperties中,所以只需在application.properties中配置一下
1 | =callback.do |
修改QQ登录按钮请求路径
1 | <a href="/qqLogin/callback.do">QQ登录</a> |
启动测试

成功访问
SignIn错误
这里我们点击登录后,会发现跳转到了认证页面
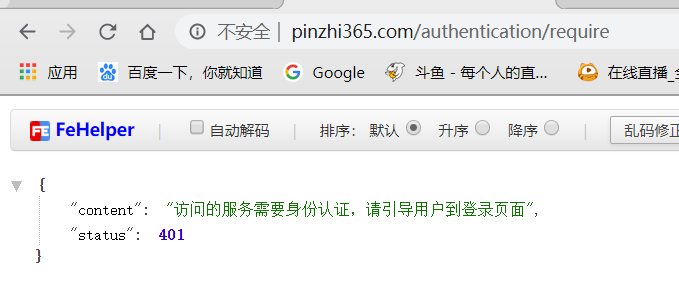

服务费输出跳转路径为http://www.pinzhi365.com/signin,又因为我们没有signin这个页面,并且没有对请求授权,所以会被之前写的Security认证拦截,因为没有登录,如果登录了或者授权放行了,应该会报出404错误
SignIn错误原因源码分析
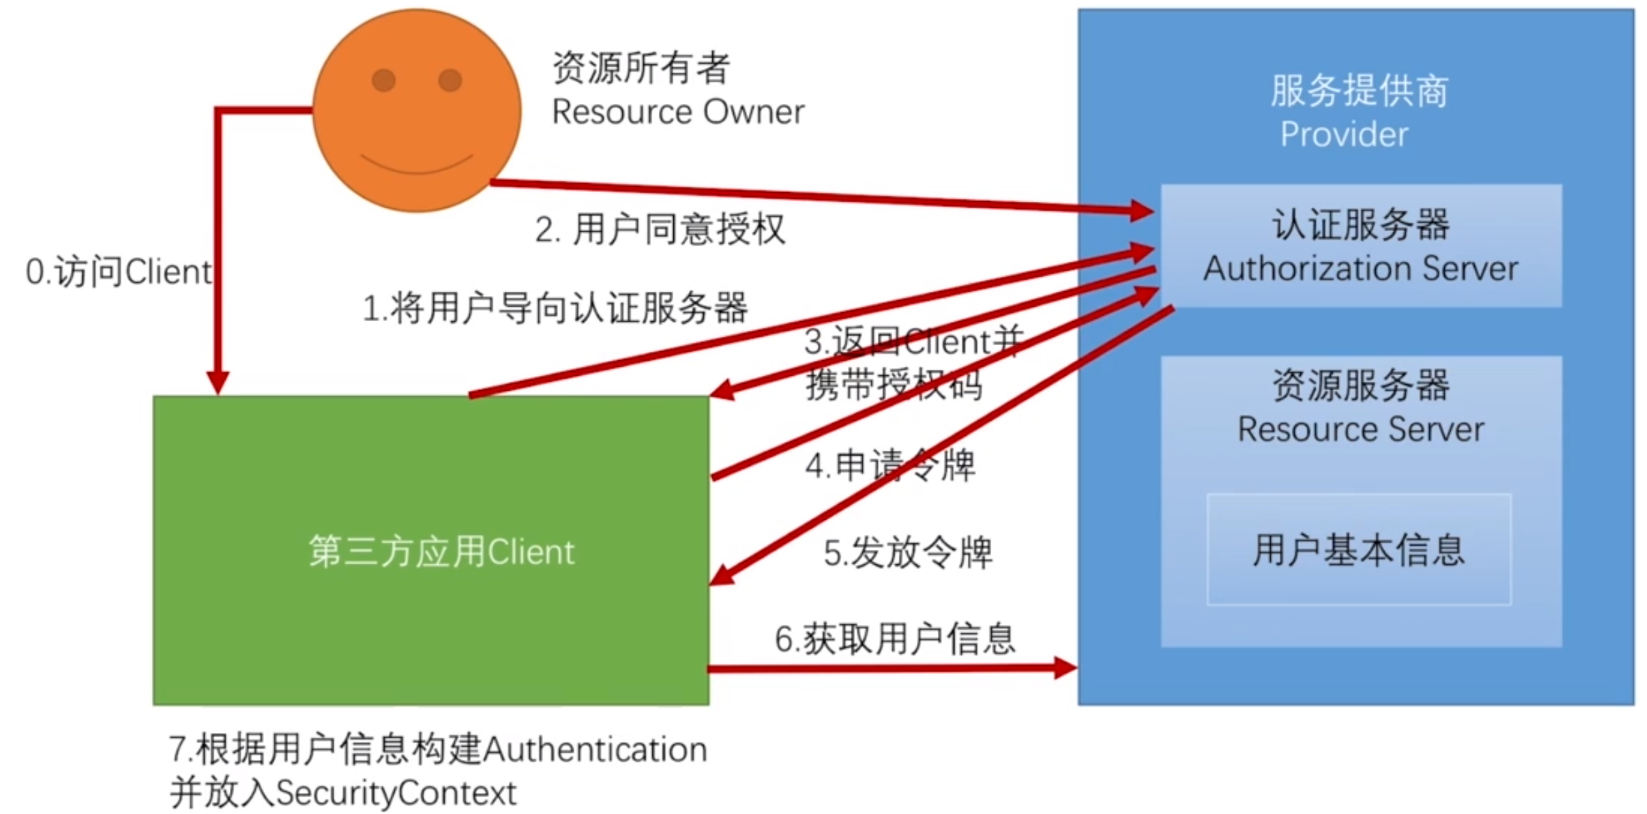
SpringSocial认证流程

首先我们先看一下SpringSocial的拦截器执行流程图,这里相较前面学习的认证流程原理其实就多了三个组件:
ConnectionFactory:需要我们自己实现,在流程里的作用就是通过授权码换取令牌(Connection)Connection:需要我们自己实现,令牌,被封装到SocialAuthorizationToken中保存SocialUserDetailsService:需要我们自己实现,根据userId去数据库获取用户信息
通过这个流程,我们可以发现最重要的就是ConnectionFactory前面的那个组件SocialAuthorizationService,他是请求第三方服务,获取授权码并使用授权码获取令牌的重要步骤~
我们进入源码一点点断点查看,为何会出现这个错误
AbstractAuthenticationProcessingFilter
首先查看AbstractAuthenticationProcessingFilter:
1 | public void doFilter(ServletRequest req, ServletResponse res, FilterChain chain) |
其实这个代码我们之前都看过,最重要的就是attemptAuthentication()方法,调用实现类的认证方法进行认证。
SocialAuthenticationFilter
进入到SocialAuthenticationFilter的attemptAuthentication()方法
1 | public Authentication attemptAuthentication(HttpServletRequest request, HttpServletResponse response) throws AuthenticationException { |
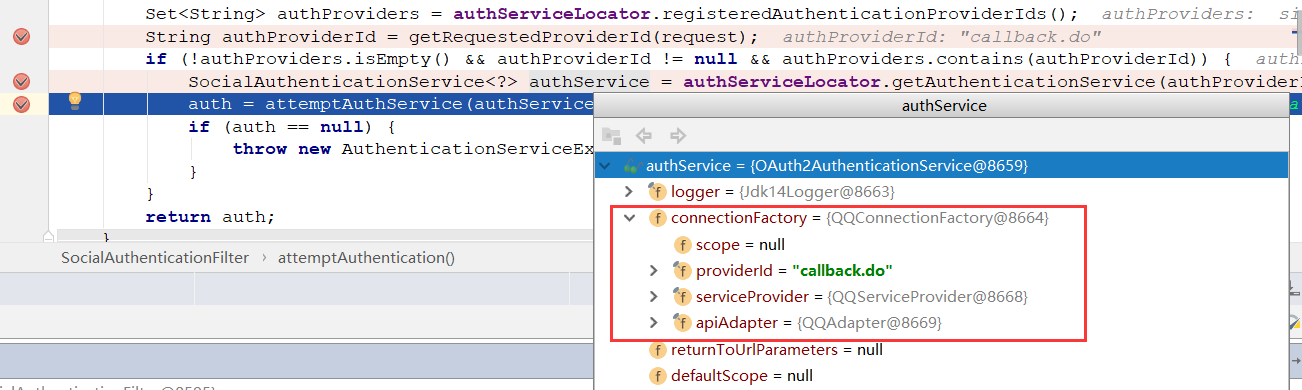
断点进去看,可以发现就是我们之前实现的QQ登录的Connection以及ServiceProvider
OAuth2AuthenticationService
接着我们进入到getAuthToken()方法中,实现类为OAuth2AuthenticationService,这段代码非常关键了!!!
1 | public SocialAuthenticationToken getAuthToken(HttpServletRequest request, HttpServletResponse response) throws SocialAuthenticationRedirectException { |
这里因为我们的请求路径和第三方回调路径都是一样的,所以会使用授权码来判断:
- 第一次请求,抛出重定向异常,错误处理类就会重定向到第三方认证页面
- 回调请求,使用授权码获取令牌

往下走的时候,走到exchangeForAccess()即使用授权码获取令牌的时候报错,报了RestClientException异常
然后return null; 我们知道,如果返回null,那么肯定是认证失败,会进入失败处理类,这里Social失败处理类是SocialAuthenticationFailureHandler
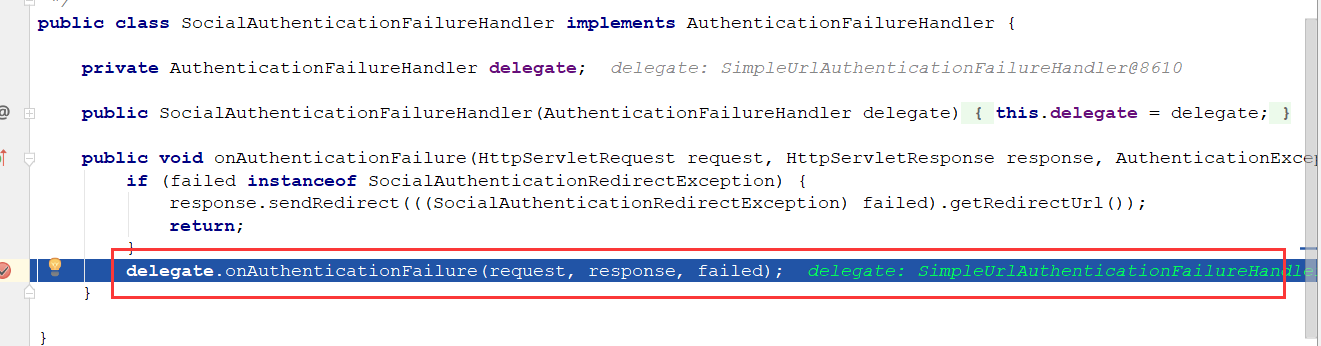
实现类是SimpleUrlAuthenticationFailureHandler
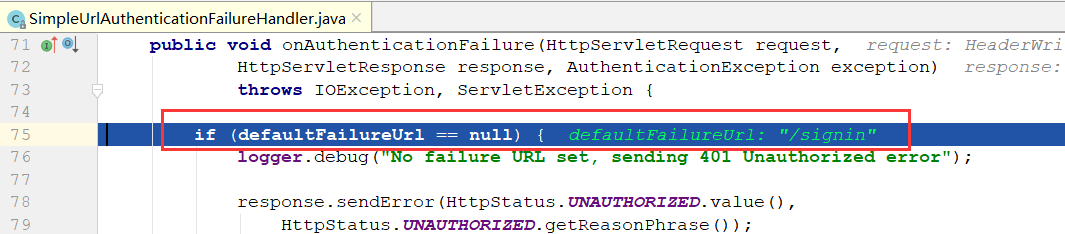
这里就看到默认重定向URL/signin的地址了,这也是为什么转跳/signin的原因
RestClientException异常
找到了转跳/signin的原因了,接着要看为啥抛出RestClientException异常了
这里我们直接查看报错方法exchangeForAccess(),我们使用的是默认的实现类即OAuth2Template
1 | public AccessGrant exchangeForAccess(String authorizationCode, String redirectUri, MultiValueMap<String, String> additionalParameters) { |
这里在代码中可以看到,使用RestTemplate进行请求获取令牌,然后我们再看看报错信息
1 | Could not extract response: no suitable HttpMessageConverter found for response type [interface java.util.Map] and content type [text/html] |
意思是响应无法进行数据处理,我们看看RestTemplate的创建方法
1 | protected RestTemplate createRestTemplate() { |
它只加了如下三个HttpMessageConverter,这三个HttpMessageConverter并不能处理contentType为 [text/html]的返回信息,因此走到上面的postForAccessGrant方法会抛出RestClientException异常。
SiginIn错误的解决方式
既然默认的OAuth2Template使用有问题,那么我们就继承它重新他的方法
1 | public class QQOAuth2Template extends OAuth2Template { |
这里实现好之后,我们还需要将ServiceProvider中OAuth2Operation的实现方式改为我们自己的QQOAuth2Template
1 | public QQServiceProvider(String appId, String appSecret) { |
只需这两步,就完成了SignIn错误的修改
重启测试
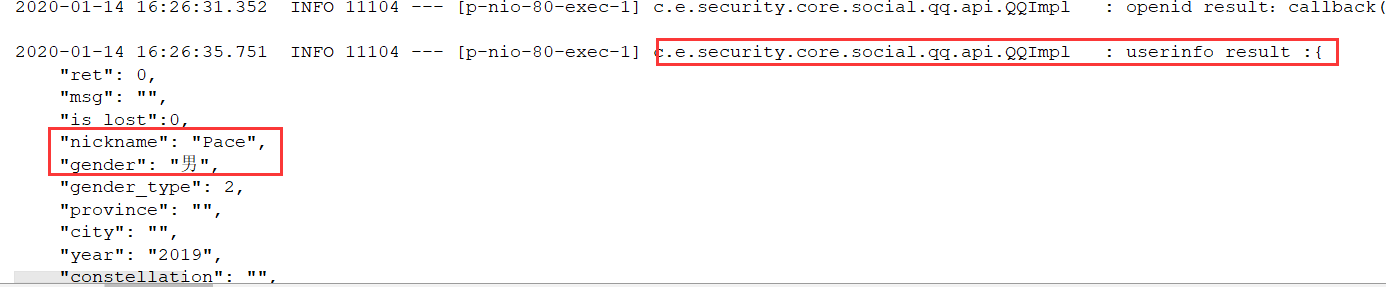
控制台正确打印信息,说明获取用户信息成功
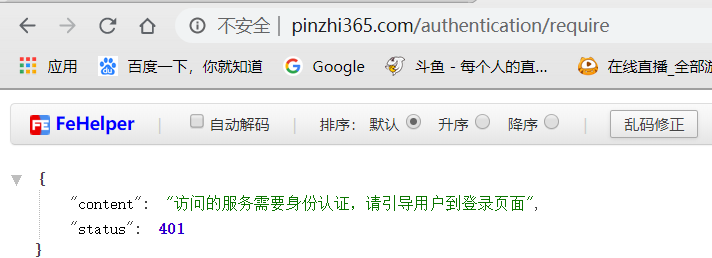
然后发现页面又又又返回401需要认证了,查看控制台

成功获取用户信息后,请求signup这个路径了,但是我们并没有配置过这个请求,所以返回401需要认证
SignUp错误
在之前,我们已经获取到QQ的用户信息,即Connection对象,那我们是哪里出了错呢?
SignUp错误原因源码分析
之前返回了401,说明没有认证,就说明认证的地方出了错,我们又知道SpringSecurity的认证是由Provider完成的,所以我们应该查看SocialAuthorizationProvider的源码,跟一下报错信息
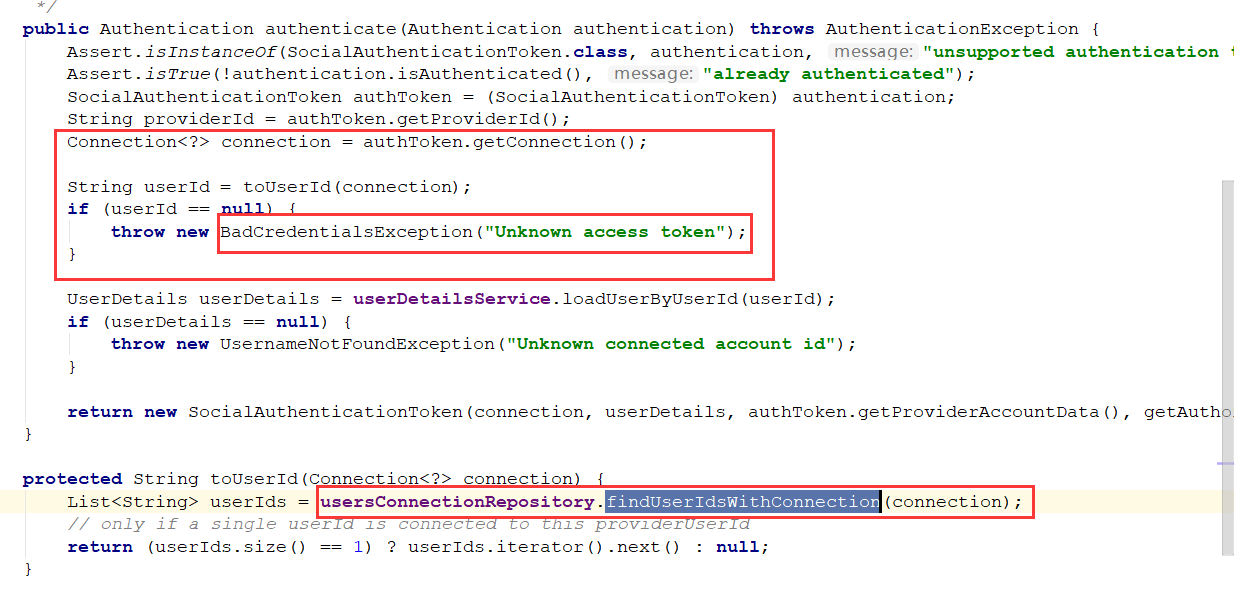
通过源码查看,其实很简单
- 首先获取刚刚封装到
Token中的Connection信息,即保存的用户信息 - 然后拿着这个用户信息向数据库查询,查关联我们应用的用户
- 问题!我们没有注册逻辑,所以表里肯定没有映射,即查出来的是null
- 因为null,所以抛出
BadCredentialsException异常
抛出的异常肯定是最上层捕获,我们去SocialAuthorizationFilter看看
1 | private String signupUrl = "/signup"; |
这里的源码就清晰明了了,捕获异常后判断signupUrl是否存在,默认为/signup,所以是存在的,然后抛出重定向异常,让SecurityExceptionFilter进行重定向处理,转到/signup页面,因为我们没有这个页面并且没有做授权,所以出现了上面401问题
SignUp问题解决方式
解决方式很简单,只需写一个注册页面,然后再SocialConfig中配置一下即可,这里我们把注册页面弄成可配置的
创建注册页面
1 |
|
在配置类中添加signup配置
1 | public class BrowserProperties { |
这里是在之前创建的BrowserProperties中配置,上层是SecurityProperties,不了解的可以看一下之前SpringSecurity表单登录的笔记。
配置SpringSocialConfig
在SocialConfig类中:
1 |
|
添加一个signupUrl()方法,设置为我们的注册页面路径
这里还有一个要配置的就是添加认证信息
1 | http. |
这时可以启动测试
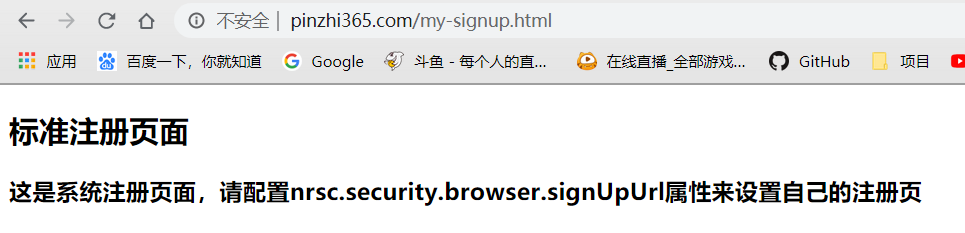
可以看到,跳转到了标准的注册页面,接着我们写一个自定义的注册页面,并在application.properties中设置
配置自定义注册页
1 |
|
1 | # 注册页面配置 |
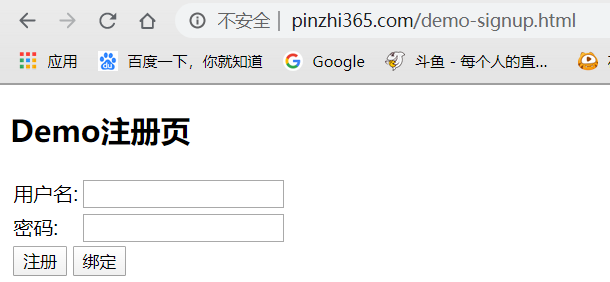
成功配置
剩下的问题
到此,第三方QQ登录的基本逻辑问题已经完成了,剩下还有一些问题我们之后解决,如接下来的注册逻辑,这里不只是简单的向我们的用户表插入一条数据,还包括向userconnection表保存应用于第三方QQ用户的映射数据