本篇文章我们研究Spring Security开发基于表单的登录的最后一块内容,基于短信验证码的接口开发。 前面的文章我们讲解了基于图片验证码的校验,有兴趣的同学可以翻看一下。
这篇文章除了讲解短信验证码的开发之外,我们还会对之前的代码做一次重构,我们希望短信验证码和图片验证码的逻辑的公共部分可以抽离出来。
开发短信验证码接口
实现思路
我们的代码类似于图片验证校验,进行实现
首先肯定要写一个生成短信的类,然后将这个短信通过接口发送出去(这个接口可以有很多实现,因为有不同的短信服务提供商)。
既然有短信,肯定有一个短信的封装类,还需要配置类,配置短信验证码长度,过期时间等。
创建短信验证码信息封装类
因为短信和图片成员变量类似,所以集体抽象出来为ValidateCode,并使两个封装类继承此类
短信验证码直接调用父类构造方法
图片验证码新增一个图片变量
1 | public class SmsCode extends ValidateCode { |
创建短信验证码配置类
1 | public class SmsCodeProperties { |
和之前短信的类似,只不过少了长和宽,然后将此配置类放到上层ValidateCodeProperties中
1 | public class ValidateCodeProperties { |
创建短信验证码生成类
这里还是使用之前的接口,但是需要改一下返回值,改为刚刚抽象出来的封装类
1 | public interface ValidateCodeGenerator { |
短信生成类:
1 | public class SmsCodeGenerator implements ValidateCodeGenerator { |
短信生成方式很简单,就是生成配置长度的随机数,这里默认4位
创建短信验证码发送类
这里我们还是以可重用可替代原则,接口+实现类形式开发
1 | public interface SmsCodeSender { |
1 | public class DefaultSmsCodeSender implements SmsCodeSender { |
注意:因为各个短信商的接口不同,这里只需重新这个Sender方法即可,根据不同的接口调用规则进行重写
将相关类注入到容器中
1 |
|
这里还是和之前一样,只需向容器中添加对应组件即可替代默认实现类
实现短信验证码发送接口
重用之前Controller类,再写一个发送的接口
1 |
|
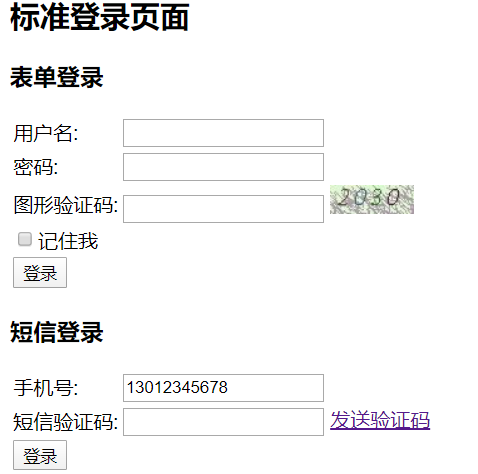
修改登录页面
1 | <body> |
在原来的基础上添加一个短信登录的表单,这里手机号是写死的,方便测试
启动测试
登录页面显示没问题,点击发送验证码

控制台成功打印信息,说明发送成功,即我们短信验证码接口开发完毕
短信验证码校验认证
其实不管短信验证码还是图片验证码,我们学习SpringSecurity更重要的是对其校验认证的实现。所以重心更应该放在认证上面。
认证思路
对于短信的校验和图片校验不同,因为他需要登录,而图片校验只需要校验然后再执行自带的密码拦截即可。
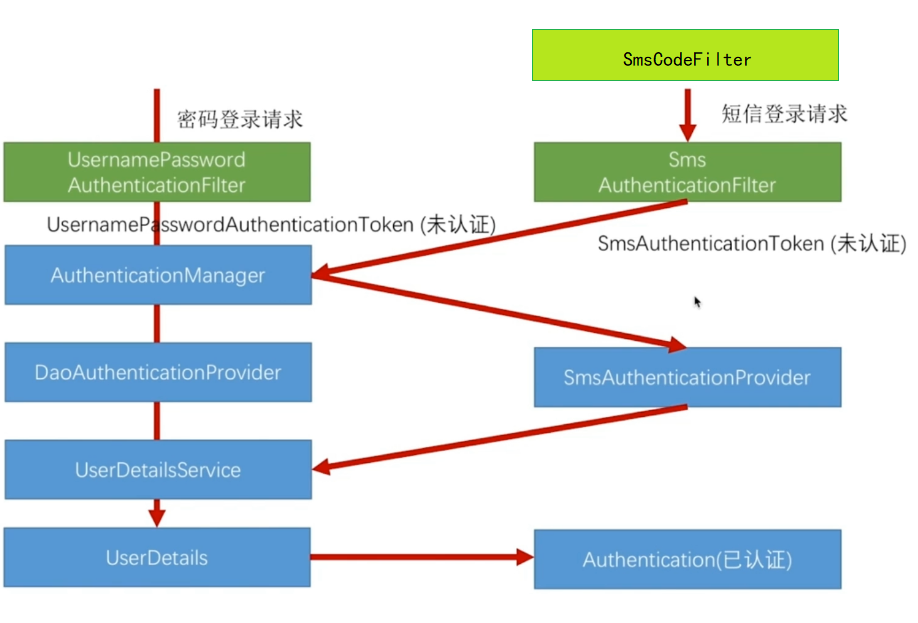
我们可以仿照密码认证方式,写一个短信认证,如图:
- 首先和图片校验一样,写一个短信校验拦截器,这里没有直接放在短信认证Provider中,是为了可重用,比如支付的时候也需要短信校验,那么就得再写一个拦截器才可以,放在外面可以直接使用
- 然后仿照
UsernamePassword认证拦截器,实现一个短信认证拦截器,并编写一个短信认证Token - 调用
AuthenticationManager,这个是公用的,不需我们实现,因为这个只是Provider的管理器,会根据我们实现的SMSAuthenticationToken找到我们实现的SmsAuthenticationProvider - 然后实现短信认证Provider,为的是通过获取匹配我自己生成的短信Token,来获取UserDetails,将其认证状态改为已认证
代码实现
创建短信校验过滤器
功能:拦截表单提交,验证短信验证码是否匹配
1 | public class SmsCodeFilter extends OncePerRequestFilter { |
这里实现方式和图片验证码一样,只是改了SessionKey和匹配获取的路径
创建短信认证Token
我们只需仿照UsernamePasswordAuthenticationToken来编写即可,这里我们不需要密码参数,因为我们的匹配校验是在前面SMSCodeFilter做的,所以关于密码的都删除。
1 | public class SmsAuthenticationToken extends AbstractAuthenticationToken { |
创建短信认证过滤器
这里实现可以仿照UsernamePasswordAuthenticationFilter,一样把密码相关的删除,并且使用刚刚创建的SmsAuthenticationToken做Token实现类,需要设置拦截路径为/authentication/mobile,即表单提交路径
1 | public class SmsAuthenticationFilter extends AbstractAuthenticationProcessingFilter { |
创建短信认证Provider
Provider只需实现AuthenticationProvider两个方法即可
1 | public class SmsAuthenticationProvider implements AuthenticationProvider { |
配置短信认证
这里需要先将我们自定义的短信认证相关类装配到Security组件中,这里我们在Core模块下新加一个SecurityConfig类,而不是使用原来的
1 |
|
这里独立出来的原因是,我们不止浏览器可以使用,APP也可以使用相同的短信认证方式,所以抽离了出来,在其他安全配置中想要引入此配置,只需编写以下代码即可:
1 |
|
配置短信校验
接着还需要将SmsCodeFilter对密码校验的类和之前图片验证码一样添加到BrowserSecurityConfig中:
1 |
|
这里最后需要追加短信安全的配置,才能和这个表单进行关联
注意!这里还需要将表单提交配置在application.propeties中,不然无法被SmsCodeFilter拦截进行校验
1 | =/authentication/mobile |
启动测试
首先我们在短信登录表单直接登录,不输入验证码
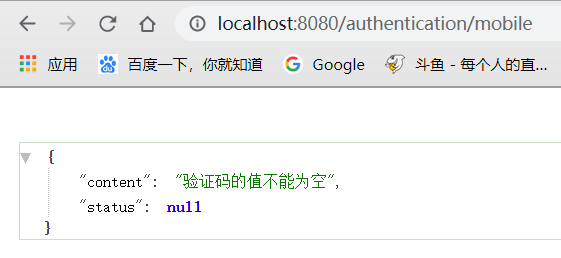
出现错误提示,说明我们已经成功了一般,接着查看控制台输入正确验证码
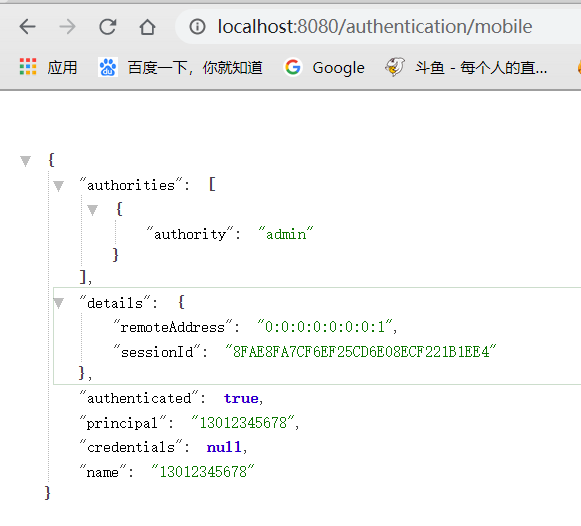
返回用户信息,说明我们短信校验认证已经成功,最后访问helloworld
成功访问,说明成功保存登录状态