通过之前的学习,我们发现不管对于自定义认证逻辑还是流程,都是对SpringSecurity提供的接口进行实现,比如UserDetailsService,UserDetails等等,都是一些碎片化的东西,这里我们就需要研究SpringSecurity的源码,看看它是如何把这些碎片拼接成一个完整的图片的。
认证处理流程
还记得之前那张图
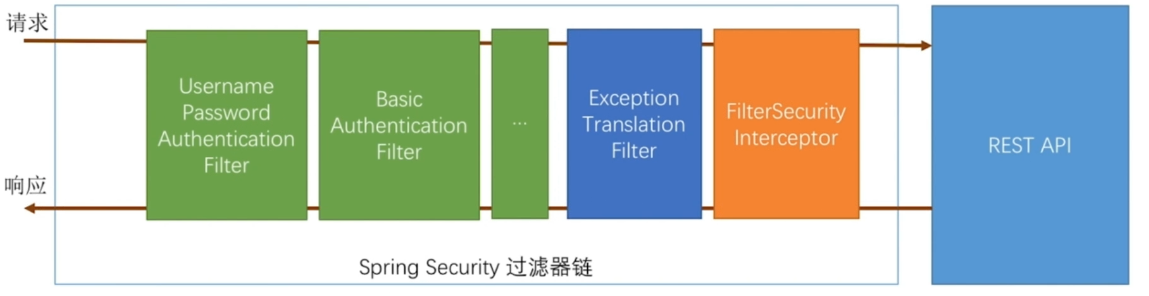
为SpringSecurity过滤器链路,这里我们主要分析的是UsernamePasswordAuthenticationFilter,在这个过滤器里都做了什么,涉及了哪些类,这个过滤器也是认证处理的主要类。
我们根据这张图,来进行源码分析查看,并最后做出总结,一开始我们只需简单查看了解这个流程即可。
UsernamePasswordAuthenticationFilters
创建一个未认证对象
1 | public Authentication attemptAuthentication(HttpServletRequest request, |
我们从UsernamePasswordAuthenticationFilter类中方法上可以看到
首先创建一个UsernamePasswordAuthenticationToken对象,通过构造方法可知,setAuthenticated(false)是未认证状态
然后setDetails(),为对象设置请求信息
最后getAuthenticationManager().authenticate(authRequest),调用AuthenticationManager的认证方法进行认证
AuthenticationManager
找到正确的AuthenticationProvider
AuthenticationManager是一个接口,实现是由ProviderManager进行实现,ProvideManager负责管理AuthenticationProvider,看一下源码:
1 | public Authentication authenticate(Authentication authentication) |
这里为什么要循环所有的Provider呢?,
因为对于Provider有SocialAuthenticationProvider(第三方接入的时候专用),AbstractUserDetailsAuthenticationProvider(我们配置的时候用到的)等等。
其实真正执行的只有一个provider,那么究竟会选择哪一个provider,我们看到有一个supports方法。也就是根据上一步中的authentication的类型来做判断。
找到正确的Provider后,调用Provider的认证方法对未认证对象进行认证
AuthenticationProvider
进行认证
这里因为我们使用用户名密码的表单登录,所以实现类为AbstractUserDetailsAuthenticationProvider:
1 | public Authentication authenticate(Authentication authentication) |
这里我把源码精简了一下,可以清晰看出认证过程
首先获取UserDetails对象,这就是我们实现UserDetailsService接口编写的那个对象
调用前置判断
1 | private class DefaultPreAuthenticationChecks implements UserDetailsChecker { |
这里就是判断我们之前说的那几个布尔属性,是否被锁,是否可用,账户是否过期
匹配用户名密码
1 | protected void additionalAuthenticationChecks(UserDetails userDetails, |
后置判断
1 | private class DefaultPostAuthenticationChecks implements UserDetailsChecker { |
判断用户是否过期
创建认证对象
1 | protected Authentication createSuccessAuthentication(Object principal, |
这里调用构造函数时传了三个参数
1 | public UsernamePasswordAuthenticationToken(Object principal, Object credentials, |
在代码中可以清楚的看到,super.setAuthenticated(true);说明为认证用户
AbstractAuthenticationProcessingFilter
失败或成功处理类调用
这个类是UsernamePasswordAuthenticationFilter的父类,doFilter()方法是由他实现的,所以创建完认证用户返回后,会执行此类的doFilter方法
1 | public void doFilter(ServletRequest req, ServletResponse res, FilterChain chain) |
代码很简单,就是判断用户是否认证,如果没有调用unsuccessfulAuthentication()方法,如果认证成功调用successfulAuthentication()方法
unsuccessfulAuthentication()
1 | protected void unsuccessfulAuthentication(HttpServletRequest request, |
这里就是我们自定义的认证失败处理类failureHandler的调用
successfulAuthentication()
由上面可以推断出,这个类其实就是调用我们自定义的认证成功处理类successHandler
1 | protected void successfulAuthentication(HttpServletRequest request, |
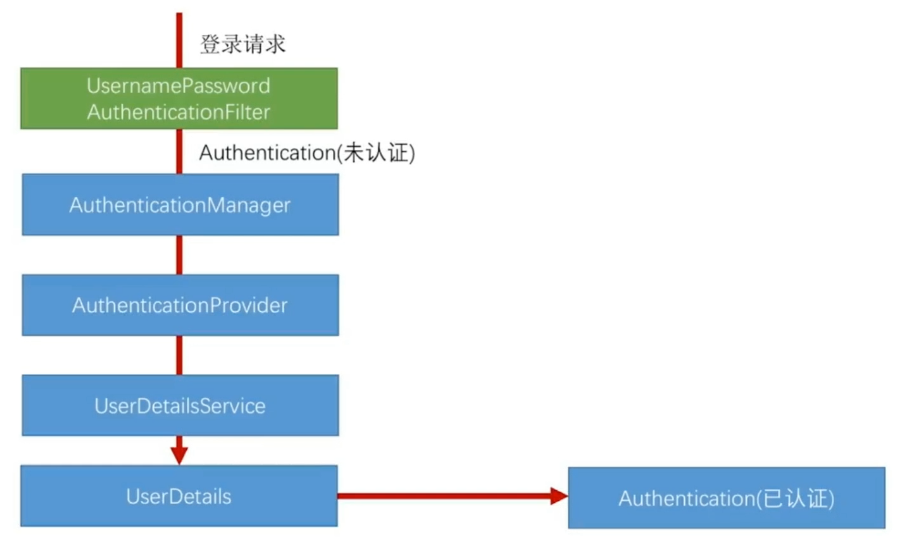
总结
如图,走了这些方法,主要步骤为:
UsernamePasswordAuthenticationFilters创建一个未认证对象,将对象信息进行初始化AuthenticationManager循环查找对应的Provider,调用Provider的authenticate对未认证对象认证AuthenticationProvider对未认证对象进行校验,通过调用UserDetailsService方法,获取UserDetails对象,进行判断,如果成功,创建一个已认证对象,返回UsernamePasswordAuthenticationFiltersAbstractAuthenticationProcessingFilter进行doFilter()释放请求,对认证成功Handler或认证失败Handler进行调用
由此,我们上两节研究的几个接口就串起来了,主要有:UserDetailsService,UserDetails,successHandler,failureHandler
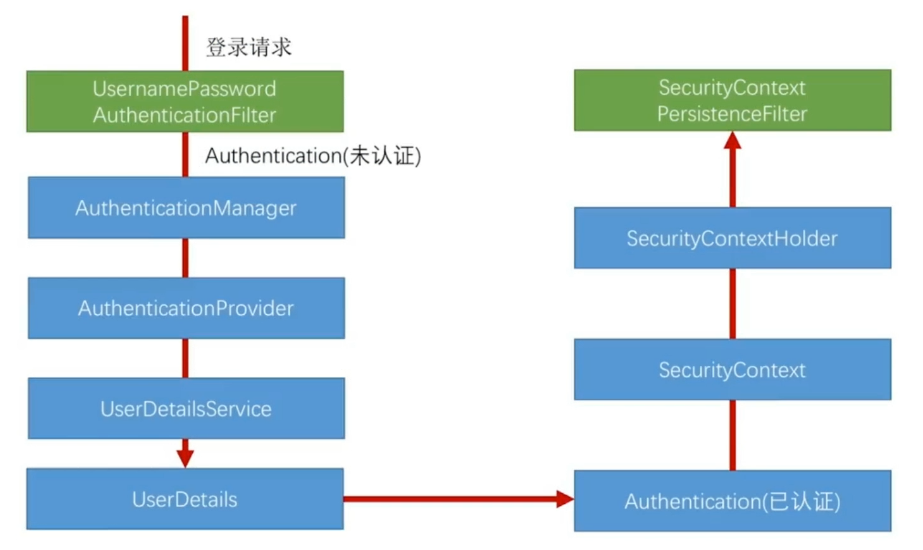
认证结果在多个请求间共享
将认证结果在多个请求间共享,第一想到的就是放到上下文中,其实就是这样,我们可以看一下认证成功后调用的方法:
1 | protected void successfulAuthentication(HttpServletRequest request, |
在这里可以看到SecurityContextHolder.getContext().setAuthentication(authResult);,将结果放到了SecurityContext上下文中,并且最后给SecurityContextHolder
SecurityContextHolder是一个ThreadLocal的包装类,即对多线程进行处理的类。
这样下次请求过来的时候,直接从context中取就可以,那么,是谁把认证信息放到context中的呢?
SecurityContextPersistenceFilter
就是SecurityContextPersistenceFilter这个过滤器
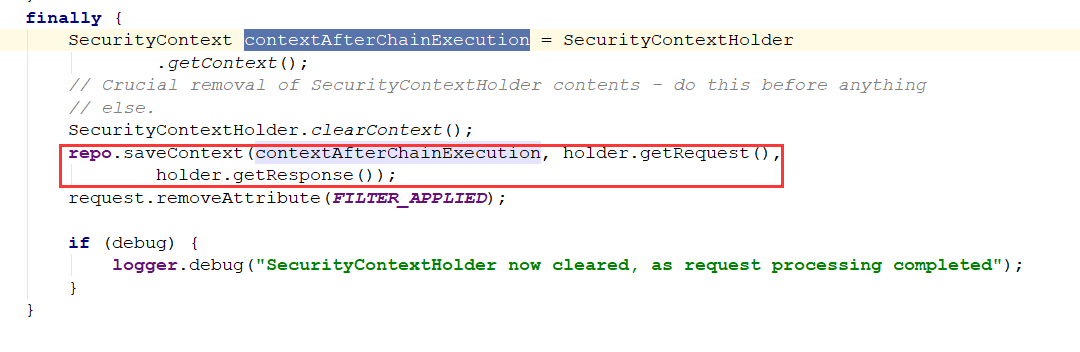
在Filter的最后,如果存在认证后用户信息,就一定会把context存入到session中,这样如果用户已经登录过一次,session中可以拿到Context,context中就可以拿到UsernamePasswordAuthenticationToken
当然如果没有用户信息,就直接跳过
获取认证用户信息
1 |
|
这里有两种方法,一种直接从容器中获取Authentication,得到的是:

详细信息以及请求的一些信息,如果不想给别人这么详细的信息就可以使用第二种方式
只获取用户的信息,即Principal中的信息

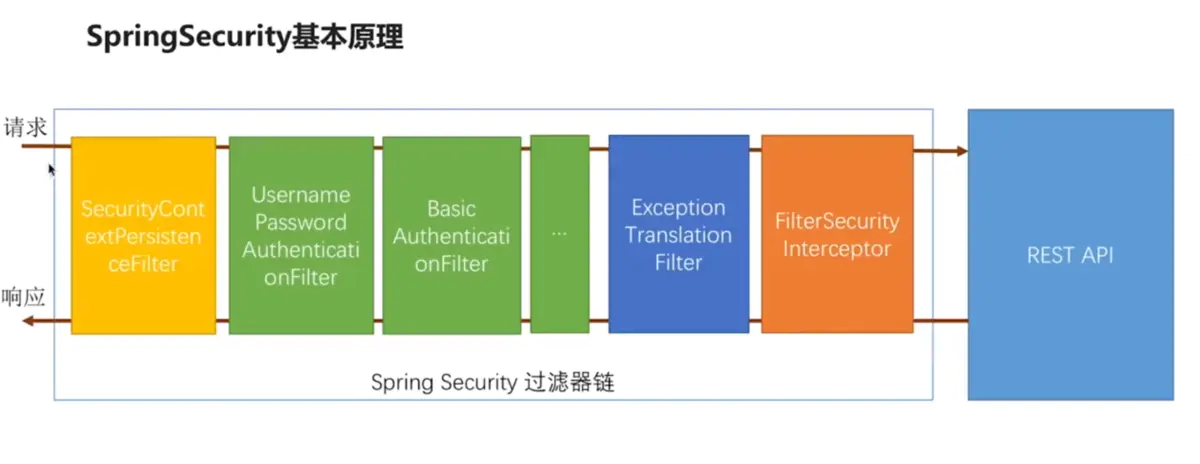
总结
用一张图来总结: