SpringSecurity01-与SpringBoot整合

授权与认证

说到授权认证,可能会第一时间想到登录,那么登录不就是账号密码输入,然后加密到数据库里匹配是否正确吗?有什么难的,其实登录很重要:

  • 登录认证模式多样
    • QQ登录
    • 短信登录
    • 微信登录
  • 支持的前端渠道多样
    • 网页端
    • APP端
  • 支持集群环境,跨应用工作,Session控制,控制用户权限,说防护与身份认证相关的攻击

认证和授权如此复杂,因此也诞生了作者对SpringSecurity系列的学习。本系列将主要从SpringSecuritySpring SocialSpring Security OAuth来给大家进行讲解。

  • SpringSecuritySpring SocialSpring Security OAuth的底层实现是它,我们主要研究它实现用户名+密码认证和手机号+短信认证的,和底层代码实现。
  • Spring Social主要用于第三方认证,比如QQ,微信的接入。
  • Spring Security OAuth来创建、分发、管理Token信息,因为APP和后端服务器通讯的时候无法存储Session的问题,所以我们采用Token的方式来存储登录用户的认证信息,就需要用到OAuth

img

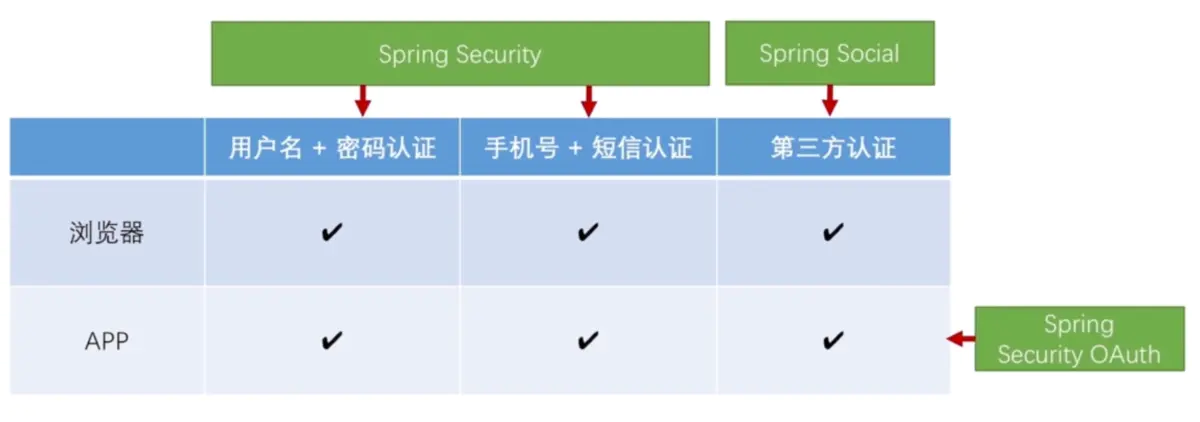
如上图,也可以清除看出来三个安全组件的职责

开发架构搭建

既然要学习SpringSecurity,肯定需要例子进行学习,这里我们会创建一个主模块用来管理依赖,4个从模块用来写业务代码,使用SpringBoot2.x进行整合,如下:

1578038376381

  • spring-security:主模块,主要用于依赖管理
  • spring-security-app:app相关代码
  • spring-security-browser:浏览器安全相关代码
  • spring-security-core:核心业务逻辑代码
  • spring-security-demo:样例代码

下面我们开始搭建,这里我们主要是将所需依赖进行引入,即修改pom文件

spring-security

这里引入spring.io是因为他集成了非常多的依赖,比如SpringBoot,SpringSecurity,oauth2等等,这里Cairo-SR7版本使用了SpringBoot2.0.8版本,用作依赖管理,之后在子模块引入依赖时就不需要添加版本了

引入Cloud也只是用作依赖管理,没有进行使用

1
2
3
4
5
6
7
8
9
10
11
12
13
14
15
16
17
18
19
20
21
22
23
24
25
26
27
28
29
30
31
32
<dependencyManagement>
<dependencies>
<dependency>
<groupId>io.spring.platform</groupId>
<artifactId>platform-bom</artifactId>
<version>Cairo-SR7</version>
<type>pom</type>
<scope>import</scope>
</dependency>
<dependency>
<groupId>org.springframework.cloud</groupId>
<artifactId>spring-cloud-dependencies</artifactId>
<version>Finchley.RELEASE</version>
<type>pom</type>
<scope>import</scope>
</dependency>
</dependencies>
</dependencyManagement>
<build>
<plugins>
<plugin>
<groupId>org.apache.maven.plugins</groupId>
<artifactId>maven-compiler-plugin</artifactId>
<version>2.3.2</version>
<configuration>
<source>1.8</source>
<target>1.8</target>
<encoding>UTF-8</encoding>
</configuration>
</plugin>
</plugins>
</build>

spring-security-core

对于核心代码,这里引入了最关键的oauth2以及social相关的依赖

并且引入了redis和jdbc依赖,因为到时候业务需要存储Session或token时,需要保存到redis或mysql

1
2
3
4
5
6
7
8
9
10
11
12
13
14
15
16
17
18
19
20
21
22
23
24
25
26
27
28
29
30
31
32
33
34
35
36
37
38
39
40
41
42
43
44
45
46
47
48
49
50
<dependencies>
<dependency>
<groupId>org.springframework.cloud</groupId>
<artifactId>spring-cloud-starter-oauth2</artifactId>
</dependency>
<dependency>
<groupId>org.springframework.boot</groupId>
<artifactId>spring-boot-starter-data-redis</artifactId>
</dependency>
<dependency>
<groupId>org.springframework.boot</groupId>
<artifactId>spring-boot-starter-jdbc</artifactId>
</dependency>
<dependency>
<groupId>mysql</groupId>
<artifactId>mysql-connector-java</artifactId>
</dependency>
<dependency>
<groupId>org.springframework.social</groupId>
<artifactId>spring-social-config</artifactId>
</dependency>
<dependency>
<groupId>org.springframework.social</groupId>
<artifactId>spring-social-core</artifactId>
</dependency>
<dependency>
<groupId>org.springframework.social</groupId>
<artifactId>spring-social-security</artifactId>
</dependency>
<dependency>
<groupId>org.springframework.social</groupId>
<artifactId>spring-social-web</artifactId>
</dependency>
<dependency>
<groupId>commons-lang</groupId>
<artifactId>commons-lang</artifactId>
</dependency>
<dependency>
<groupId>commons-collections</groupId>
<artifactId>commons-collections</artifactId>
</dependency>
<dependency>
<groupId>commons-beanutils</groupId>
<artifactId>commons-beanutils</artifactId>
</dependency>
<dependency>
<groupId>org.springframework.boot</groupId>
<artifactId>spring-boot-configuration-processor</artifactId>
</dependency>
</dependencies>

spring-security-app

对于app模块,只需引用核心模块即可,因为引用都包含在core中了,所以它的pom.xml很简单

1
2
3
4
5
6
7
<dependencies>
<dependency>
<groupId>com.enbuys</groupId>
<artifactId>spring-security-core</artifactId>
<version>1.0-SNAPSHOT</version>
</dependency>
</dependencies>

spring-security-browser

browser也是引用核心模块,但是稍有不同的是因为它是浏览器,所以需要使用session,依赖需要添加一个session

1
2
3
4
5
6
7
8
9
10
11
<dependencies>
<dependency>
<groupId>com.enbuys</groupId>
<artifactId>spring-security-core</artifactId>
<version>1.0-SNAPSHOT</version>
</dependency>
<dependency>
<groupId>org.springframework.session</groupId>
<artifactId>spring-session-data-redis</artifactId>
</dependency>
</dependencies>

spring-security-demo

这里我们暂时先引入browser,后期在讲token方面的东西的时候会引入app,另外我们这里还加入了spring-boot-maven-plugin,让我们打包成可运行的jar包,如果说大家不加后面的build,可以看到你打出来的jar包是没有把相关的依赖放进去的,是没法直接执行的。

1
2
3
4
5
6
7
8
9
10
11
12
13
14
15
16
17
18
19
20
21
22
23
24
<dependencies>
<dependency>
<groupId>com.enbuys</groupId>
<artifactId>spring-security-browser</artifactId>
<version>1.0-SNAPSHOT</version>
</dependency>
</dependencies>
<build>
<plugins>
<plugin>
<groupId>org.springframework.boot</groupId>
<artifactId>spring-boot-maven-plugin</artifactId>
<version>1.3.3.RELEASE</version>
<executions>
<execution>
<goals>
<goal>repackage</goal>
</goals>
</execution>
</executions>
</plugin>
</plugins>
<finalName>demo</finalName>
</build>

Hello World

既然我们创建好了工程,那么肯定要先写一个helloworld运行一下

创建启动器类

1
2
3
4
5
6
7
8
9
10
11
12
13
@SpringBootApplication
@RestController
public class Application {

public static void main(String[] args) {
SpringApplication.run(Application.class,args);
}

@GetMapping("/helloworld")
public String helloworld(){
return "spring security hello world!";
}
}

这里如果我们直接启动,一定会报错,因为我们添加了数据库依赖,但没有配置数据库连接信息

添加配置文件

1
2
3
4
5
6
7
spring.datasource.driver-class-name=com.mysql.jdbc.Driver
spring.datasource.url=jdbc:mysql://127.0.0.1:3306/test?useUnicode=yes&characterEncoding=UTF-8&useSSL=false
spring.datasource.username=root
spring.datasource.password=root

# 关闭Session会话管理
spring.session.store-type=none

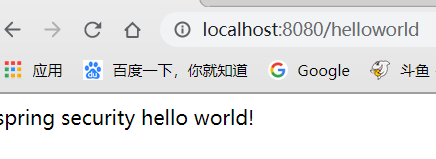
添加完配置文件后,可以重新启动,发现启动成功,这时访问http://localhost:8080/helloworld

1578041859566

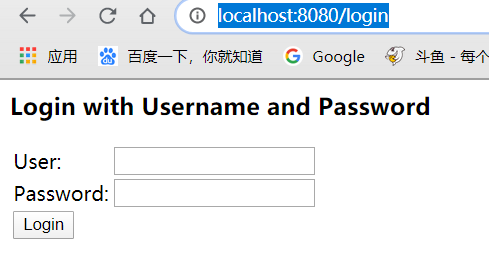
会发现跳转到login页面,这是因为在springboot环境下,spring security会被自动装配,即默认开启

这里的用户名密码可以通过查看SecurityProperties类发现:

1578042358776

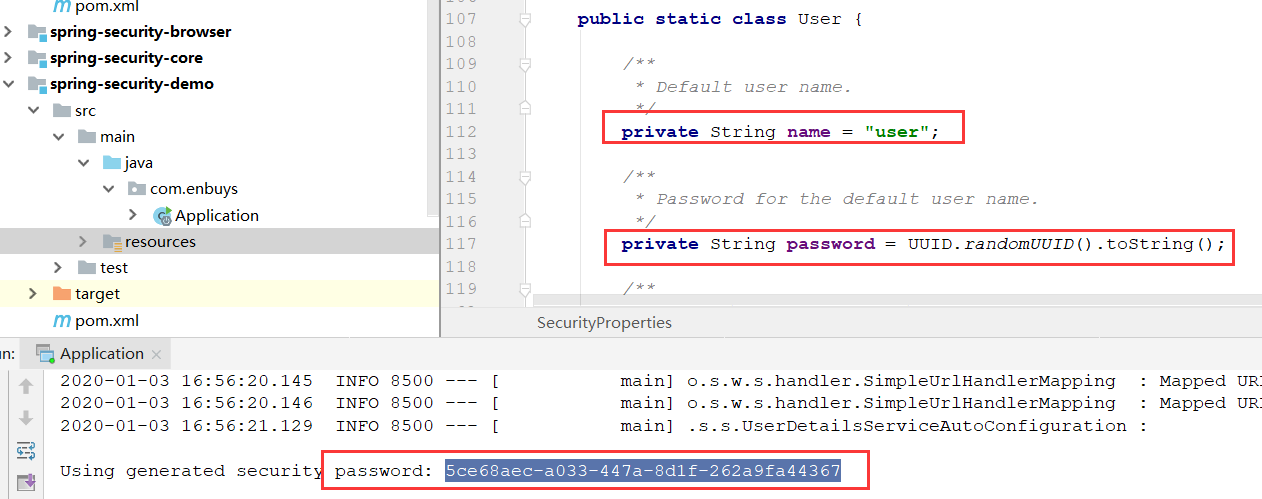
用户名默认为user,密码是UUID自动生成的,会打印在控制台,这里输入用户名密码即可看到打印的信息

1578042395982

关闭Security自动装配

springboot2.x版本之前的关闭方法:

  • 配置文件中添加:security.basic.enabled=false

springboot2.x之后版本关闭方法:

  • 在启动器类上添加注解,排除Security的自动装配
1
2
3
@EnableAutoConfiguration(exclude = {
SecurityAutoConfiguration.class
})

重新启动后访问

1578042406822

成功访问,并且控制台没有打印UUID生成的密码了

本篇文章,我们主要是简单介绍Security和使用springboot2.0先把基本框架搭建好,后面的文章中,我们将深入Security进行研究