RabbitMQ整合-SpringAMQP(一)

Spring AMQP是用于以AMQP为基础的MQ中间件的解决方案,对于底层API进行封装,使开发者在对MQ进行操作时更加易用,并进行了一些拓展与优化。

这里我们主要使用RabbitMQ与SpringAMQP整合,对于其他以AMQP规范制作的中间件也是差不多的整合方式。

SpringAMQP核心内容

  • RabbitAdmin:管控组件
  • RabbitTemplate:消息模板组件
  • SimpleMessageListenerContainer:简单消息监听容器
  • MessageListenerAdapter:消息适配器
  • MessageConverter:消息转换器

接下来,我们就需要对这些核心内容进行研究

RabbitAdmin

RabbitAdmin的主要作用就是方便的操作Exchange,Queue,Binding这些信息

使用它需要几点注意:

  • 需要将RabbitAdmin注入到上下文中,注入的前提是ConnectionFactory在上下文中,所以要先注入ConnectionFactory
  • 注入时要设置autoStartup=true,不然不会加载RabbitAdmin

    快速入门

添加依赖

需要使用spring的amqp依赖,这里为了方便,使用的springboot的工程

1
2
3
4
5
6
7
8
9
<dependency>
<groupId>com.rabbitmq</groupId>
<artifactId>amqp-client</artifactId>
<version>3.6.5</version>
</dependency>
<dependency>
<groupId>org.springframework.boot</groupId>
<artifactId>spring-boot-starter-amqp</artifactId>
</dependency>

注入RabbitAdmin

1
2
3
4
5
6
7
8
9
10
11
12
13
14
15
16
17
18
19
20
21
22
23
@SpringBootApplication
public class Application {
public static void main(String[] args) {
SpringApplication.run(Application.class,args);
}

@Bean
public ConnectionFactory connectionFactory(){
CachingConnectionFactory cachingConnectionFactory = new CachingConnectionFactory();
cachingConnectionFactory.setAddresses("192.168.56.120:5672");
cachingConnectionFactory.setUsername("guest");
cachingConnectionFactory.setPassword("guest");
cachingConnectionFactory.setVirtualHost("/");
return cachingConnectionFactory;
}

@Bean
public RabbitAdmin rabbitAdmin(ConnectionFactory connectionFactory){
RabbitAdmin rabbitAdmin = new RabbitAdmin(connectionFactory);
rabbitAdmin.setAutoStartup(true);
return rabbitAdmin;
}
}

这里,我直接写在启动器类了,注入RabbitAdmin前提是注入ConnectionFactory,这里使用的spring.amqp下的而不是之前使用的rabbit下的ConnectionFactory

需要注意的是 rabbitAdmin.setAutoStartup(true); 要设置为true,不然不会被加载此类

测试

接着我们在Test类进行测试,简单的创建一个交换机,试试是否注入成功

1
2
3
4
5
6
7
8
9
10
11
12
13
14
@RunWith(SpringRunner.class)
@SpringBootTest
public class ApplicationTests {

@Autowired
private RabbitAdmin rabbitAdmin;

@Test
public void testAdmin() throws Exception {
// 添加Exchange
rabbitAdmin.declareExchange(new DirectExchange("spring.direct",false,false,null));
}

}

这里使用SpringBoot的Test类,然后运行,查看控制台

1577331837654

成功创建,说明RabbitAdmin注入成功

RabbiAdmin基本操作

针对Exchange

1
2
3
4
5
6
7
8
9
10
11
12
13
14
15
16
@Test
public void testExchange() throws Exception {
/* 对Exchange的操作 */
// 添加Exchange
rabbitAdmin.declareExchange(new DirectExchange("spring.direct",
false,false,null));
// 添加 topic类型的Exchange
rabbitAdmin.declareExchange(new TopicExchange("spring.topic",
false,false,null));
// 添加fanout类型的Exchange
rabbitAdmin.declareExchange(new FanoutExchange("spring.fanout",
false,false,null));

// 删除Exchange
rabbitAdmin.deleteExchange("spring.fanout");
}

具有声明以及删除的操作

针对Queue

1
2
3
4
5
6
7
8
9
10
11
12
13
14
15
16
17
@Test
public void testQueue() throws Exception {
/* 对Queue的操作 */
// 创建Queue,并设置不持久化
rabbitAdmin.declareQueue(new Queue("spring.direct.queue",false));

// 获取Queue的属性
Properties properties = rabbitAdmin.getQueueProperties("spring.direct.queue");
System.out.println(properties);

// 删除Queue
rabbitAdmin.deleteQueue("spring.direct.queue");

// 清空Queue中的消息
// 这里使用死信队列,因为之前有一条死信消息没有被消费
rabbitAdmin.purgeQueue("dlx_queue",false);
}

这里我们获取了Queue中的信息,主要获取到了消费者数量,信息数量,队列名,如下图:

1577342664941

针对Binding

1
2
3
4
5
6
7
8
9
10
11
12
13
14
15
16
17
18
19
20
21
@Test
public void testBinding() throws Exception {
/* 对Binding的操作 */
// 添加Exchange与Queue绑定关系,先添加一条队列和一个Exchange
rabbitAdmin.declareExchange(new DirectExchange("spring.direct",false,false,null));
rabbitAdmin.declareQueue(new Queue("spring.direct.queue",false));
rabbitAdmin.declareBinding(new Binding(
"spring.direct.queue", // 队列名
Binding.DestinationType.QUEUE, // 绑定的是队列,也可以交换机之间进行绑定
"spring.direct", // 交换机名称
"direct", // 路由键
null));

// 解除绑定关系
rabbitAdmin.removeBinding(new Binding(
"spring.direct.queue", // 队列名
Binding.DestinationType.QUEUE, // 绑定的是队列,也可以交换机之间进行绑定
"spring.direct", // 交换机名称
"direct", // 路由键
null));
}

主要就是绑定和解绑

注解声明

在刚开始学习RabbitMQ的时候,使用最基础的API进行创建Exchange,Queue或Binding

1
2
3
channel.exchangeDeclare(exchange,"topic",true);
channel.queueDeclare(queue,false,false,false,null);
channel.queueBind(queue,exchange,routingKey);

通过上面的学习,我们使用RabbitAdmin进行创建

1
2
3
rabbitAdmin.declareExchange(DirectExchange);
rabbitAdmin.declareQueue(Queue);
rabbitAdmin.declareBinding(Binding);

那么有没有更简单的创建方式呢?

就是使用@Bean注解进行声明,放入到容器中,然后配合RabbitAdmin会自动进行加载并统一创建

1
2
3
4
5
6
7
8
9
10
11
12
13
14
15
16
17
18
19
20
21
22
@Component
public class RabbitBean {

@Bean
public DirectExchange directExchange(){
return new DirectExchange("spring.ann.direct");
}

@Bean
public Queue queue(){
return new Queue("spring.ann.direct.queue",false);
}

@Bean
public Binding binding(){
return new Binding("spring.ann.direct.queue",
Binding.DestinationType.QUEUE,
"spring.ann.direct",
"ann.direct",
null);
}
}

这里我创建一个RabbitBean类,并添加@Component注解,使之注入到上下文容器中。

然后再到Test测试类,随便执行一条RabbitAdmin的语句,如下:

1
2
3
4
@Test
public void testQueue() throws Exception {
rabbitAdmin.purgeQueue("dlx_queue",false);
}

这时,回到控制台,会发现已经创建成功,并绑定了关联关系

1577347040970

注意:必须使用rabbitAdmin执行某个方法,才能成功创建

为什么要这样呢?我们进入源码探究

源码分析

首先进入到RabbitAdmin类中

1577347472865

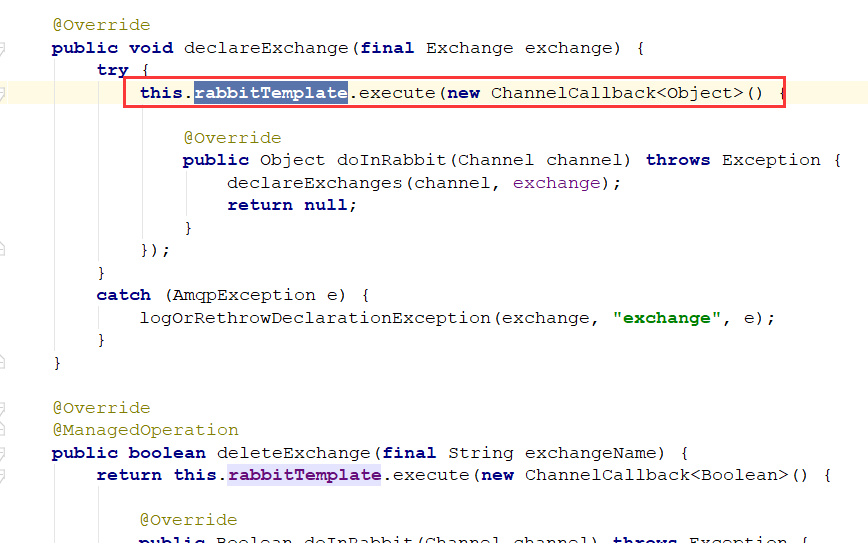
可以发现之前那些创建Exchange,Queue的方法,都是先调用RabbitTemplateRabbitTemplate创建Channel再返回RabbitAdminChannelCallback()回调函数

比如如下的回调函数:

1577347668908

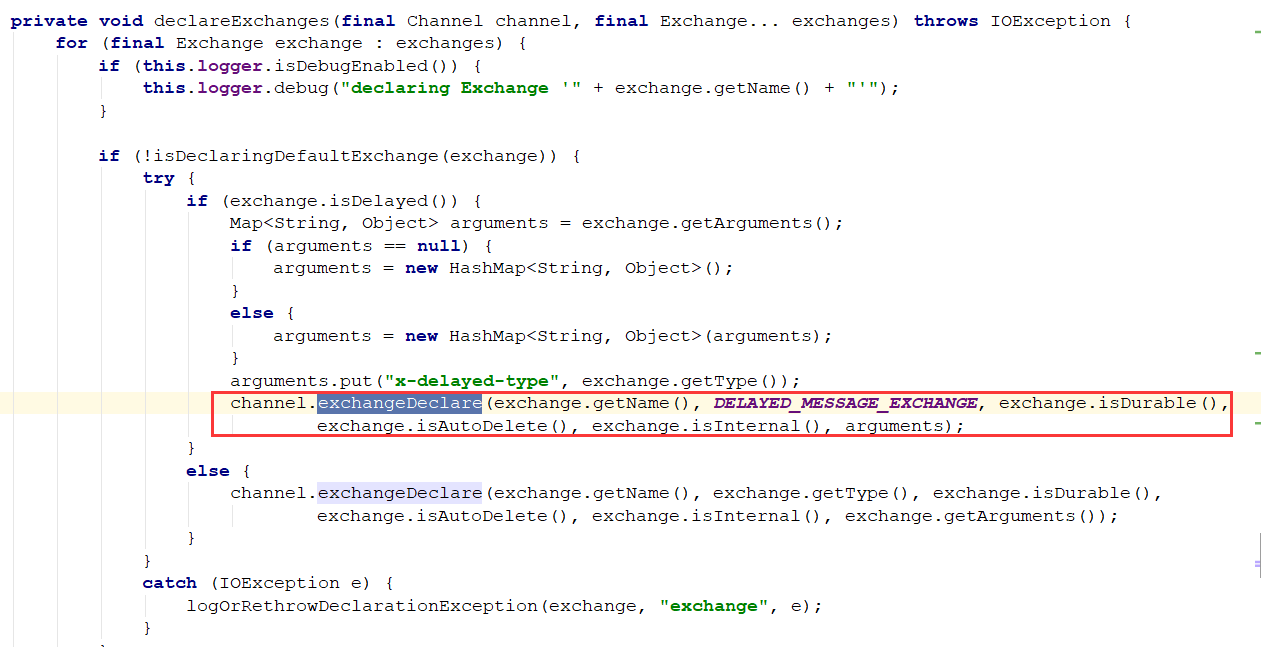
最终调用的方法和我们一开始单独使用rabbitmq时一样

接着我们看看RabbitAdmin是如何自动创建被@Bean声明的交换机队列的

1
2
public class RabbitAdmin implements AmqpAdmin, ApplicationContextAware, ApplicationEventPublisherAware,
InitializingBean {

首先在类的实现接口中,就能发现端倪,InitializingBean,初始化Bean,按理说要自动创建肯定是初始化的时候,那么和这个接口肯定息息相关

1
2
3
4
5
public interface InitializingBean {

void afterPropertiesSet() throws Exception;

}

这个类中只有一个方法,就是初始化之后执行的方法,再回到RabbitAdmin中看看这个方法

1
2
3
4
5
6
7
8
9
10
11
12
13
14
15
16
17
18
19
20
21
22
23
24
25
26
27
28
29
30
31
32
@Override
public void afterPropertiesSet() {

synchronized (this.lifecycleMonitor) {
// 判断autoStartup是否开启 也是我们一开始说的那个参数,只有开启了才会接着加载
if (this.running || !this.autoStartup) {
return;
}

··· // 省略一些配置
// 添加一个Connection监听器
this.connectionFactory.addConnectionListener(new ConnectionListener() {

// Prevent stack overflow...
private final AtomicBoolean initializing = new AtomicBoolean(false);

@Override // 当创建连接时 执行
public void onCreate(Connection connection) {
if (RabbitAdmin.this.retryTemplate != null) {
RabbitAdmin.this.retryTemplate.execute(
new RetryCallback<Object, RuntimeException>() {
@Override
public Object doWithRetry(RetryContext c) throws RuntimeException {
initialize();
return null;
}
});
}
});

}
}

这里主要是添加一个connection监听器,并当监听器连接时,调用initialize()方法,然后我们再进入这个方法看看

1
2
3
4
5
6
7
8
9
10
11
12
13
14
15
16
17
18
19
20
21
22
23
24
25
26
27
28
29
30
31
32
33
34
35
36
37
38
39
40
41
42
43
44
45
46
47
48
49
50
51
52
53
54
55
public void initialize() {
// 先创建各种类型的集合,用来保存Exchange,Queue等等
Collection<Exchange> contextExchanges = new LinkedList<Exchange>(
this.applicationContext.getBeansOfType(Exchange.class).values());
Collection<Queue> contextQueues = new LinkedList<Queue>(
this.applicationContext.getBeansOfType(Queue.class).values());
Collection<Binding> contextBindings = new LinkedList<Binding>(
this.applicationContext.getBeansOfType(Binding.class).values());

@SuppressWarnings("rawtypes")
// 从上下文容器中获取Exchange,Queue,Binding类型的类
// 这里就是获取我们刚刚使用@Bean进行声明的类
Collection<Collection> collections = this.declareCollections
? this.applicationContext.getBeansOfType(Collection.class, false, false).values()
: Collections.<Collection>emptyList();
for (Collection<?> collection : collections) {
if (collection.size() > 0 && collection.iterator().next() instanceof Declarable) {
for (Object declarable : collection) {
if (declarable instanceof Exchange) {
contextExchanges.add((Exchange) declarable);
}
else if (declarable instanceof Queue) {
contextQueues.add((Queue) declarable);
}
else if (declarable instanceof Binding) {
contextBindings.add((Binding) declarable);
}
}
}
}

final Collection<Exchange> exchanges = filterDeclarables(contextExchanges);
final Collection<Queue> queues = filterDeclarables(contextQueues);
final Collection<Binding> bindings = filterDeclarables(contextBindings);

··· // 保存日志

// 如果没有声明,直接返回不用创建
if (exchanges.size() == 0 && queues.size() == 0 && bindings.size() == 0) {
this.logger.debug("Nothing to declare");
return;
}
this.rabbitTemplate.execute(new ChannelCallback<Object>() {
// 将被@Bean声明的那些Exchange,Queue,Binding进行创建
@Override
public Object doInRabbit(Channel channel) throws Exception {
declareExchanges(channel, exchanges.toArray(new Exchange[exchanges.size()]));
declareQueues(channel, queues.toArray(new Queue[queues.size()]));
declareBindings(channel, bindings.toArray(new Binding[bindings.size()]));
return null;
}
});
this.logger.debug("Declarations finished");

}

通过这段源码的查看,就清晰明了了,会将applicationcontext中的所有Exchange,Queue,Binding类型的对象进行取出,再统一通过channel进行创建。

这里又回到我们刚刚的问题了,为何必须使用RabbitAdmin执行某一个方法,才能创建?

  • 首先通过源码可以知道,想要创建,必须由监听器监听到connection连接,才会走初始化方法
  • 那么可以确定就是如果不使用RabbitAdmin执行某个方法,那么它不会进行connection连接,所以这里我大胆猜测,RabbitAdmin是懒加载的,只有使用到它,它才会进行连接
  • 所以我们必须要执行某个方法,让他进行连接,才能进行声明式Bean的创建

RabbitTemplate

RabbitTemplate是一个非常好用的消息模板组件,它是非常重要的消息发送类,有大量不同的send API,可以非常灵活的进行消息发送。

他还提供了可靠性投递,回调监听ConfirmCallBack,返回确认ReturnCallBack等方法,来实现ConfirmReturn

注入到容器中

RabbitTemplate和RabbitAdmin一样,都需要注入到上下文里

1
2
3
4
@Bean
public RabbitTemplate rabbitTemplate(ConnectionFactory connectionFactory){
return new RabbitTemplate(connectionFactory);
}

这里可以进行confirm已经return方法的编写,如下

1577351440989

这里我就不做添加了。

发送消息

首先可以看到RabbitTemplate有重载了大量的发送消息方法,进行灵活多样的操作

1577351301968

接下来我们通过RabbitTemplate进行发消息

1
2
3
4
5
6
7
8
9
10
11
12
13
14
15
16
17
18
19
20
21
22
23
24
25
26
27
28
29
30
31
32
33
34
35
@RunWith(SpringRunner.class)
@SpringBootTest
public class RabbitTemplateTest {

@Autowired
private RabbitTemplate rabbitTemplate;

@Test
public void sendMessage(){
// Message的Properties配置
MessageProperties messageProperties = new MessageProperties();
messageProperties.setHeader("desc","一些信息"); // 添加Header
String msg = "hello rabbitTemplate";
// 创建消息
Message message = new Message(msg.getBytes(),messageProperties);
// 发送一条消息 投递到spring.ann.direct Exchange上,路由键为ann.direct
rabbitTemplate.convertAndSend("spring.ann.direct","ann.direct",message);

// 发送一条消息,并添加后置处理,添加一些额外的信息
rabbitTemplate.convertAndSend("spring.ann.direct", "ann.direct", message,
new MessagePostProcessor() {
@Override
public Message postProcessMessage(Message message) throws AmqpException {
message.getMessageProperties().setHeader("ex","postProcess Msg");
return message;
}
});

// 这里也可以使用send进行发送
rabbitTemplate.send("spring.ann.direct","ann.direct",message);

// 简单的发送一条字符串信息
rabbitTemplate.convertAndSend("spring.ann.direct","ann.direct","simple send");
}
}

这里我们使用了几种常用发送方式,但其实它还有更多更灵活的发送方式

  • convertAndSend(String exchange, String routingKey, final Object object):简单的发送方式,exchange,routingkey进行对应,最后消息的类型可以是多种多样的,底层进行转换,字符串或者Message类封装
  • convertAndSend(String exchange, String routingKey, final Object message,final MessagePostProcessor messagePostProcessor):添加一个后置处理器,根据需求处理
  • send(final String exchange, final String routingKey, final Message message)send方法的不同是必须是Message类型的参数,而convertAndSendObject

1577352468337

发送完可以看到有4条消息,点进去详细查看

1577352679509

这里可以看到,第二第三条消息都添加了后置处理的header头,是因为在第二条消息发送的时候,那个MessagePostProcessor方法中,就已经在Message对象添加header头了,所以在第三条消息发送时,并不是他也进行了后置方法,只是Message对象还是用的原来的,导致也出现postProcess Msg(如果图片看不清,可以右键在新建标签页打开查看)