RabbitMQ高级-自定义消费者

之前的消费者

在之前的消费端,我们是如何消费的呢?

1
2
3
4
5
6
7
8
9
10
11
// 消费者
QueueingConsumer consumer = new QueueingConsumer(channel);
channel.basicConsume(queue, true, consumer);

// 消费
while (true){
// Delivery 是封装的类,封装了消息信息,配置信息,交换机信息,路由键等信息
QueueingConsumer.Delivery delivery = consumer.nextDelivery();
byte[] body = delivery.getBody();
System.out.println(new String(body));
}

创建一个QueueingConsumer,然后循环消费,将接收到的消息信息打印出来。

可以发现,这种方式耦合严重,并且不美观,那么有没有别的方式,更简单的进行消费呢?

就需要使用到接下来要说的自定义消费者

自定义消费者

为了改善之前while循环的情况,我们可以使用自定义的消费者,它更加方便,解耦性更强,实际工作中也更常用(当然不整合框架的话)。

使用方法

  • 创建一个类实现
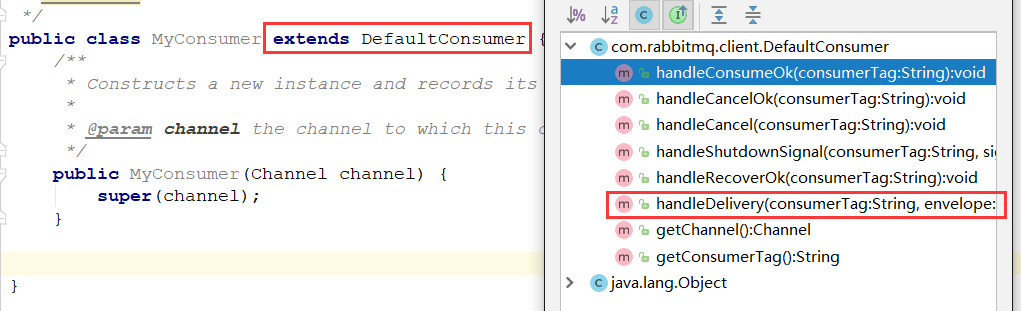
Consumer接口,并重新一系列的方法,这种方式比较繁琐,需重写所有抽象方法。
  • 创建一个类继承DefaultConsumer,这样只需要重写handleDelivery 方法即可,这种方式更简单,只需重新你所需要的方法即可。

1577254273796

代码实现

自定义Consumer

1
2
3
4
5
6
7
8
9
10
11
12
13
14
15
16
17
18
19
20
public class MyConsumer extends DefaultConsumer {
/**
* Constructs a new instance and records its association to the passed-in channel.
*
* @param channel the channel to which this consumer is attached
*/
public MyConsumer(Channel channel) {
super(channel);
}

@Override
public void handleDelivery(String consumerTag, Envelope envelope,
AMQP.BasicProperties properties, byte[] body) throws IOException {
System.out.println("----------MyConsumer----------");
System.out.println(consumerTag);
System.out.println(envelope);
System.out.println(properties);
System.out.println(new String(body));
}
}

生产端

1
2
3
4
5
6
7
8
9
10
11
12
13
14
15
16
17
18
19
20
21
22
23
24
25
26
public class Provider {

public static void main(String[] args) throws Exception{
// 1.创建连接工程
ConnectionFactory connectionFactory = new ConnectionFactory();
connectionFactory.setHost("192.168.56.120");
connectionFactory.setPort(5672);
connectionFactory.setVirtualHost("/"); // 默认创建 "/" 为虚拟主机

// 2.创建连接
Connection connection = connectionFactory.newConnection();

// 3.创建Channel通道
Channel channel = connection.createChannel();

String exchange = "test_consumer_exchange";
String routingKey = "consumer";
String msg = "hello rabbit consumer";
channel.basicPublish(exchange,routingKey,null,msg.getBytes());

// 5.关闭连接
channel.close();
connection.close();

}
}

消费端

1
2
3
4
5
6
7
8
9
10
11
12
13
14
15
16
17
18
19
20
21
22
23
24
25
26
27
28
public class Consumer {

public static void main(String[] args) throws Exception{
// 1.创建连接工程
ConnectionFactory connectionFactory = new ConnectionFactory();
connectionFactory.setHost("192.168.56.120");
connectionFactory.setPort(5672);
connectionFactory.setVirtualHost("/"); // 默认创建 "/" 为虚拟主机

// 2.创建连接
Connection connection = connectionFactory.newConnection();

// 3.创建Channel通道
Channel channel = connection.createChannel();

// 4.创建队列
String exchange = "test_consumer_exchange";
String queue = "test_consumer_queue";
String routingKey = "consumer";
channel.exchangeDeclare(exchange,"direct",true);
channel.queueDeclare(queue,false,false,false,null);
channel.queueBind(queue,exchange,routingKey);

// 绑定消费者
channel.basicConsume(queue,true,new MyConsumer(channel));

}
}

测试

先开启Consumer,然后查看15672可视化界面,是否创建对应的exchange,queue

再开启Provider,观察Consumer的控制台

1577254701142

正确展示出信息,并且还在运行,监听消息队列