使用环境Springboot1.5.10,对于Springboot2.x来说,某些源码改动,例如1.3中设置主页的源码变动
一、SpringBoot对静态资源映射
通过前面的学习,对于这种映射我们知道都需要去看底层的自动配置类,而静态资源属于Web数据,所以我们打开WebMvcAutoConfiguration查看
1 | ({ WebMvcProperties.class, ResourceProperties.class }) |
首先往下可以看到导入了一个ResourceProperties类,就是我们要找的资源配置类
1 | (prefix = "spring.resources", ignoreUnknownFields = false) |
可以设置与静态资源有关的参数,参数属性为spring.resources开头,然后可以看到我们静态资源存放路径:
1 | "classpath:/META-INF/resources/", |
1.1.webjars
对于静态资源,我们可以使用springboot带的webjars来使用:http://www.webjars.org/
1 |
|
使用方法:
根据文档在pom文件引入需要的组件,比如jquery:
1 | <dependency> |
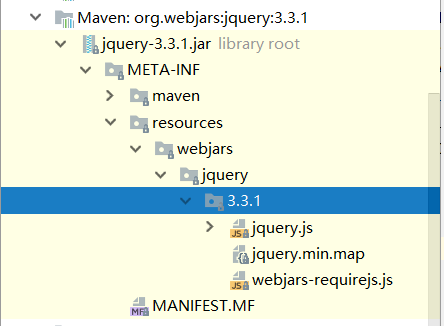
可以看到maven库里已经有这个静态文件了,根据源码可知,访问路径为/webjars/**的会去classpath:/META-INF/resources/webjars/下找,我们测试下访问jquery.js
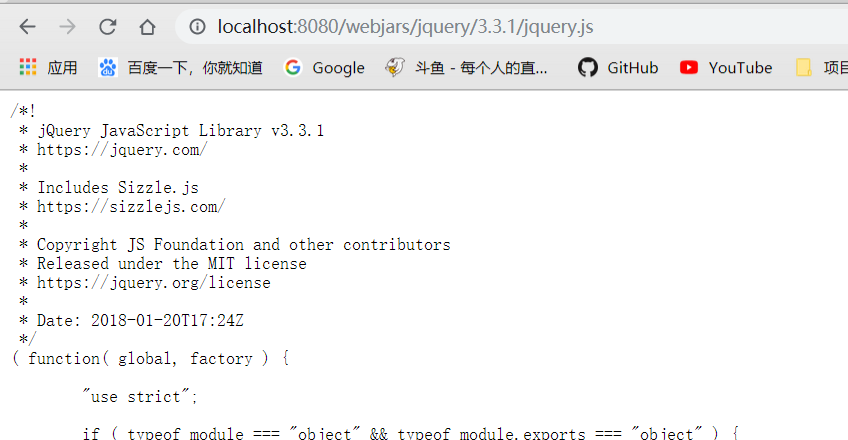
正确访问
1.2.任何资源
1 | private String staticPathPattern = "/**"; |
根据源码可知,对于访问任何资源如”/**”,会去ResourceProperties寻找
1 | getResourceLocations(this.resourceProperties.getStaticLocations()) |

就会发现其实获取的路径是我们上面说的静态资源存放的路径
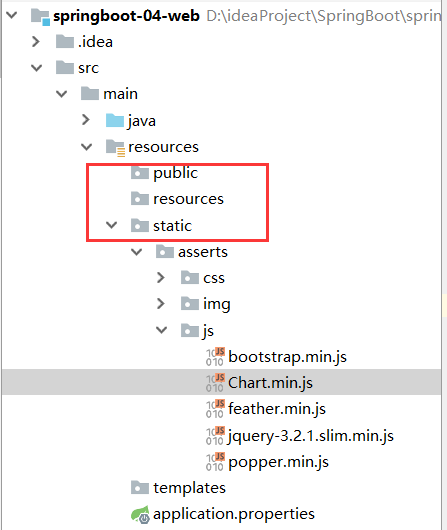
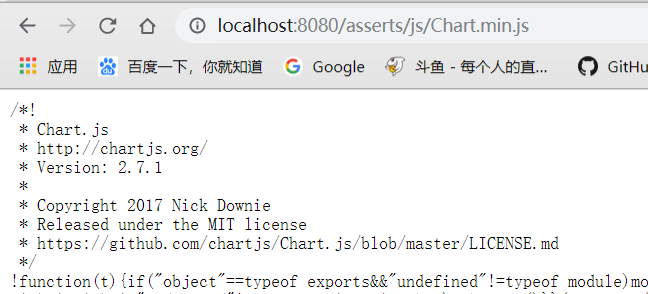
我们测试一下:访问/asserts/js/Chart.min.js
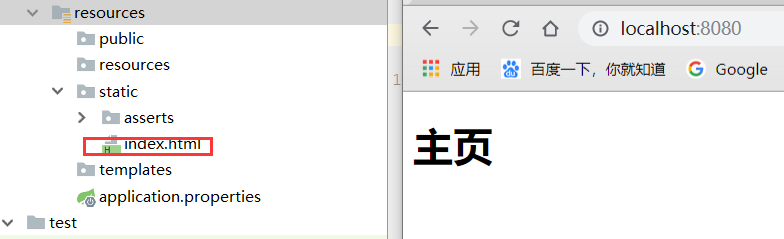
1.3.设置主页
在Springboot1.x时
1 |
|
可以根据源码得知,对于欢迎页面是先请求ResourceProperties的getWelcomePage方法
1 | private String[] getStaticWelcomePageLocations() { |
然后获取静态资源目录下是否存放index.html文件
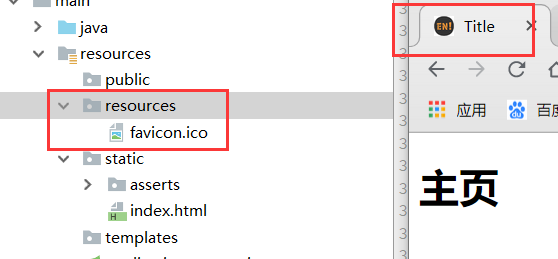
1.4.设置网址icon
1 |
|
根据源码得知,在静态文件下存放favicon.ico命名的文件便自动配置为网站的icon
二、模板引擎
模板引擎有很多,例如JSP,veloctiy,freemark,thymeleaf,主要用来方便html数据绑定的
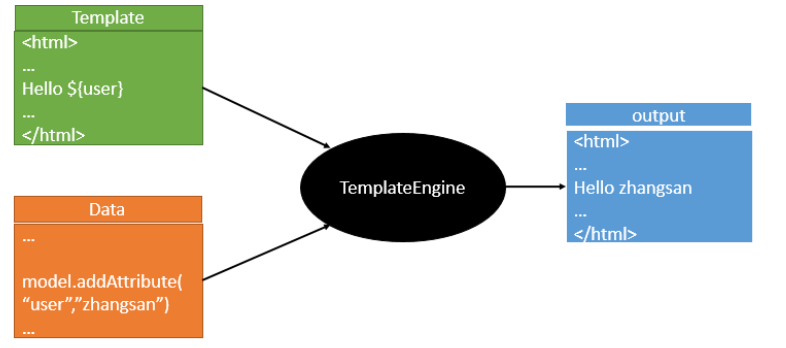
springboot推荐使用thymeleaf当做html模板引擎
2.1.引入Thymeleaf
1 | <properties> |
需要注意的是,springboot1.5.10版本默认使用thymeleaf2.x版本略低,所以改成了3.0.9版本,并使用layout2.x版本。
2.2.Thymeleaf的使用
1 | (prefix = "spring.thymeleaf") |
根据前面的学习,底层源码的研究,我们在自动配置类中找到Thymeleaf组件的ThymeleafProperties,会发现使用thymeleaf,只需在静态文件夹templates里放入html文件即可进行映射
1)编写一个html文件,放入到templates文件夹里
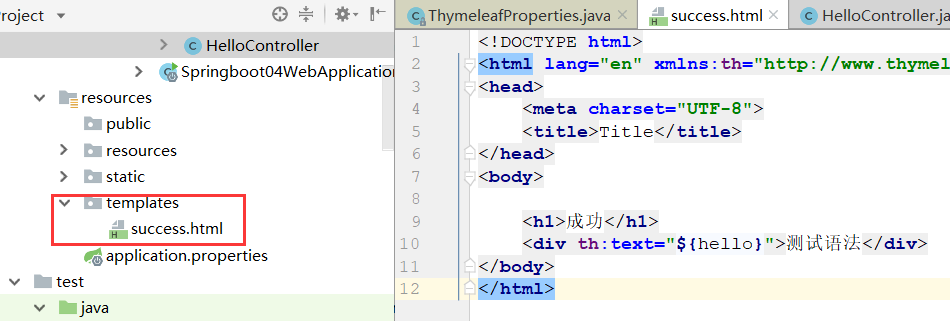
2)写一个Controller类
1 |
|
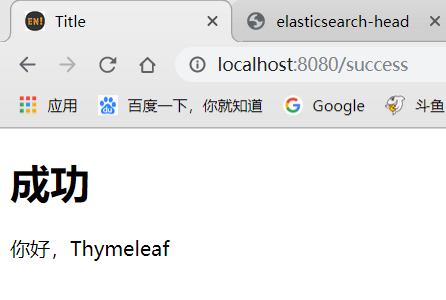
注意!要使用@Controller注解,而不是@RestController注解,这样才会返回给classpath:/templates/success.html
3)启动服务测试
2.3.Thymeleaf的语法
语法可以查看文档第四章和第十章https://www.thymeleaf.org/doc/tutorials/3.0/usingthymeleaf.pdf
语法:
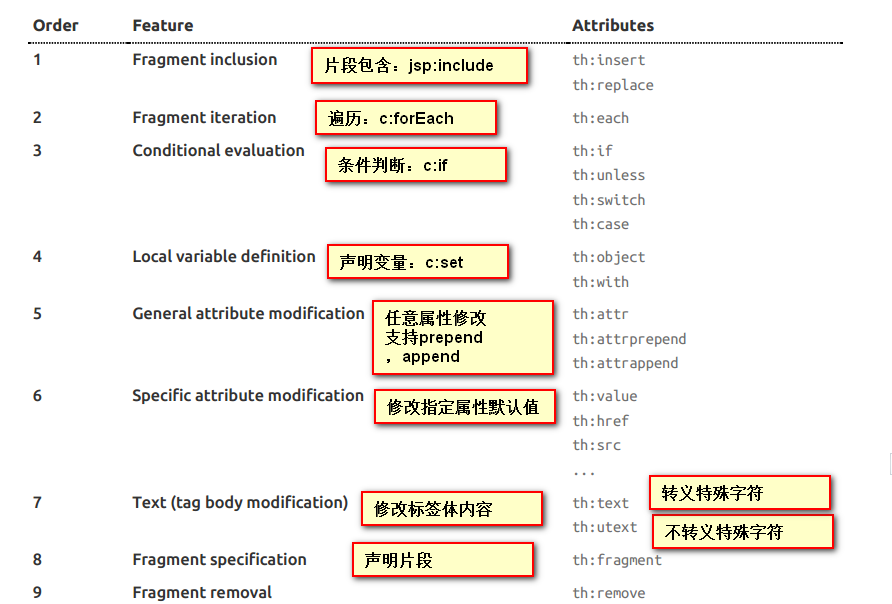
表达式
1 | Simple expressions:(表达式语法) |
关于语法,可以简单看看,不需要硬记,使用的时候查询下,用得多了自然就记住了
三、SpringMVC自动配置
查看Spring MVC auto-configuration官方文档
SpringBoot会自动配置SpringMVC:
以下是Springboot对SpringMvc的自动配置:WebMVCAutoConfiguration
3.1.视图解析器
Inclusion of
ContentNegotiatingViewResolverandBeanNameViewResolverbeans.
自动配置了视图解析器
ContentNegotiatingViewResolver:组合所有存在的视图解析器,并选择一个最适合的进行视图的解析转发。通过下面源码可知,视图解析器的组合是从容器中获取所有实现了ViewResolve的类,再进行选择
1 |
|
自定义:在容器中添加一个视图解析器,便会自动组合进ContentNegotiatingViewResolver
1 |
|
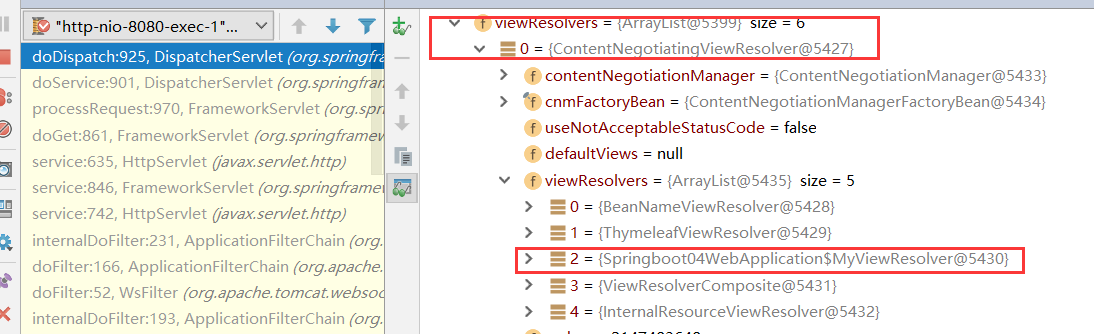
成功组合进视图解析器
3.2.静态资源
Support for serving static resources, including support for WebJars (see below).
Static
index.htmlsupport.Custom
Faviconsupport (see below).
会自动配置SpringMVC的webjars index以及favicon,在上面已经详细说过了
3.3.格式化转换器
Automatic registration of
Converter,GenericConverter,Formatterbeans.Springboot自动注册了
Converter,GenericConverter,Formatter这些格式化转换器。
Converter,GenericConverter:类型转换器,比如将18转成Integer,true转成Boolean类型
1 |
|
Formatter:格式化器,比如转换日期格式,2019-01-01 =》 date,比如上面的代码可知,可以在配置文件中配置想要的日期格式
1 |
|
根据底层源码可知,这些格式化转换器也是从容器中取出的,所以我们也可以模仿视图解析器一样自定义一些格式转换器,通过向容器添加实现了接口的Bean类。
3.4.请求响应转换
Support for
HttpMessageConverters(see below).
HttpMessageConverters:这是SpringMVC用来转换请求响应的,比如把map或Bean转成json格式。
这个组件也像上面的一样是从容器中获取的,所以也可以自定义HttpMessageConverter进行自动添加
3.5.其他的一些
Automatic registration of
MessageCodesResolver(see below).Automatic use of a
ConfigurableWebBindingInitializerbean (see below).
官方文档中还提到了错误代码生成规则MessageCodesResolver 以及数据绑定器WebBindingInitializer
也是一样可以配置一个自定义的来替换默认的
3.6.总结
SpringBoot对SpringMVC的一些必要的解析器转换器进行了默认配置,我们根据源码可知,这些组件都是从容器中获取的,所以我们可以自定义一些组件来替换默认的或添加。
- 创建一个自定义组件,实现某个接口,比如ViewResolver接口,即自定义视图解析器
- 编写代码,根据需求
- 添加@Bean注解以及@Component添加到容器中
这样SpringBoot在初始化自动配置类时,会先看容器中有没有用户自定义的一些组件(@Bean,@Component),如果有就用用户配置的,如果没有再加载默认自带的。
四、扩展SpringMVC
在以前,使用xml配置时,可以使用springmvc.xml配置一下视图映射或者拦截器等:
1 | <mvc:view-controller path="/hello" view-name="success"/> |
那么,在使用SpringBoot之后,应该如何进行扩展呢?
If you want to keep Spring Boot MVC features, and you just want to add additional MVC configuration (interceptors, formatters, view controllers etc.) you can add your own
@Configurationclass of typeWebMvcConfigurerAdapter, but without@EnableWebMvc. If you wish to provide custom instances ofRequestMappingHandlerMapping,RequestMappingHandlerAdapterorExceptionHandlerExceptionResolveryou can declare aWebMvcRegistrationsAdapterinstance providing such components.If you want to take complete control of Spring MVC, you can add your own
@Configurationannotated with@EnableWebMvc.
由官方文档可知:
1)编写一个带有@Configuration且继承了WebMvcConfigurerAdapter的扩展类,并不要添加@EnableWebMvc
1 |
|
2)根据需要,重新WebMvcConfigurerAdapter中的方法,比如addViewController()
1 |
|
还有一种方式也是很常见的:
1 |
|
这样可以在这个Config类中配置多个Configuration配置了
扩展原理
1)在WebMvcAutoConfiguration中有一个内部类WebMvcAutoConfigurationAdapter
1 | (EnableWebMvcConfiguration.class) |
他import了一个EnableWebMvcConfiguration,即启动mvc配置
2)查看EnableWebMvcConfiguration,会发现继承自DelegatingWebMvcConfiguration
1 | @Configuration |
3)在这个类中可以发现一个setConfigurers()的方法,用来设置mvc的配置
1 |
|
4)进入addWebMvcConfigurers(),会发现是从容器中获取全部的WebMvcConfigurer,并一起生效
1 | public void addWebMvcConfigurers(List<WebMvcConfigurer> configurers) { |
5)这样的话我们设置的配置类因为继承了WebMvcConfigurerAdapter,而这个父类又实现了WebMvcConfigurer,所以会被当做MVC的配置类之一加载生效,就如同SSM开发时的xml被读取到容器中生效一样。
关于@EnableWebMvc
为啥文档说扩展mvc不要添加这个注解呢?因为添加了这个注解便不是拓展,是全面接管了,SpringBoot对MVC进行的默认配置会全部失效。
比如上面说到的静态资源映射,对于”/“会自定映射index作为主页,我们试一下如果添加了@EnableWebMvc注解,还会不会映射index。

发现报出404错误,说明Springboot的默认配置未生效。
源码分析:
1)先看下@EnableWebMvc
1 | (DelegatingWebMvcConfiguration.class) |
会发现这个注解间接导入了WebMvcConfigurationSupport类
2)再看一下WebMVCAutoConfiguration的约束注解
1 |
|
@ConditionalOnMissingBean(WebMvcConfigurationSupport.class),会发现只有不存在WebMvcConfigurationSupport这个类,才会生效,而从第一步可知,因为添加@EnableWebMvc注解,导致Import了这个类,所以SpringBoot对Mvc的默认配置便不生效了
五、CRUD项目
我们通过一个简单的crud项目,进一步学习理解SpringBoot的Web开发
5.1.初始化

对应的文件放入对应的位置
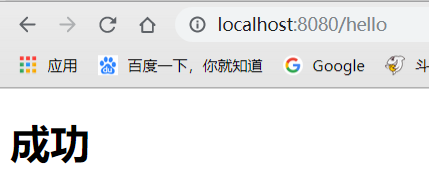
修改默认访问主页,改为login.html,通过扩展SpringMVC
1 |
|
5.2.国际化
1)创建配置文件
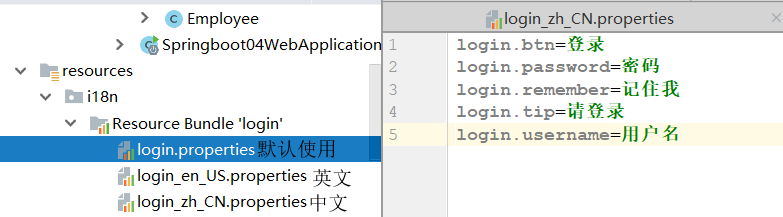
2)在配置文件中配置
想要在配置文件中配置,可以百度搜下如何配置,也可以根据源码,我们看下源码,SpringBoot对于国际化也有一个自动配置类MessageSourceAutoConfiguration:
1 | (prefix = "spring.messages") |
application.properties:
1 | =i18n.login |
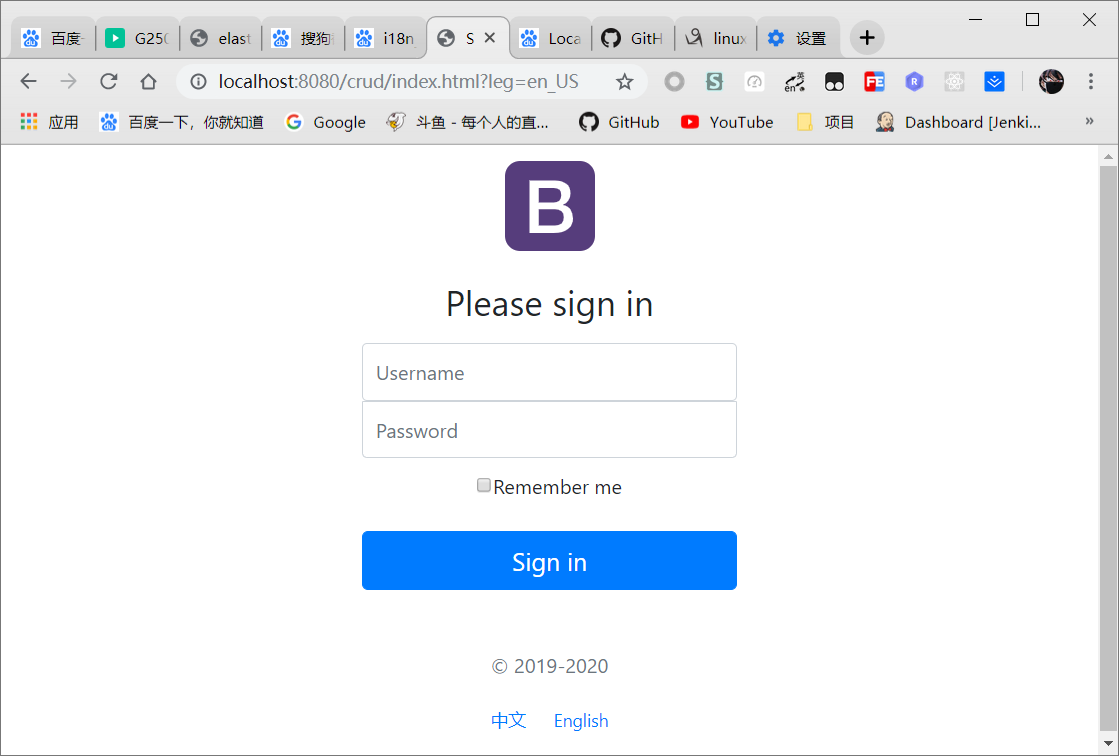
3)配置对应的html文件
1 | <form class="form-signin" action="dashboard.html"> |
4)测试查看
发现根据浏览器语言进行了国际化切换
原理
在WebMVCAutoConfiguration中,具有一个区域信息解析器LocaleResolver,由他根据区域信息Locale进行一些操作。
1 |
|
通过AcceptHeaderLocaleResolver中的resolveLocale()方法进行解析
1 |
|
根据源码可知,是由浏览器请求的request中拿去请求头,来进行国际化切换
5)通过按钮实现国际化
我们了解到了原理,便可自定义一个区域信息解析器,来制作我们自定义的国际化标准。
- 自定义解析器
1 | public class MyLocaleResolver implements LocaleResolver { |
- 添加到容器中
1 |
|
- 设置html对应按钮操作
1 | <a class="btn btn-sm" th:href="@{/index.html(leg='zh_CN')}">中文</a> |
- 测试
5.3.拦截器
我们写一下登录操作,表单提交到/user/login,简单判断下,注意,为了防止转发后表单重复提交,应使用重定向
1 |
|
1 | <form class="form-signin" action="dashboard.html" th:action="@{/user/login}" method="post"> |
1 |
|
这时候我们发现,如果没有登录,直接请求http://localhost:8080/crud/main.html,也是成功的,所以就需要添加一个拦截器。
自定义拦截器和添加其他组件一样,写一个类实现HandlerInterceptor,然后重写方法,注册到容器中,因为这个是WebMVCAutoConfiguration中的组件,所以应在WebMvc自动配置中addInterceptor,代码如下:
1)新建一个拦截器类MyHandlerInterceptor
1 | // 实现HandlerInterceptor,即这是一个拦截器 |
2)注册到容器中
1 |
|
5.4.CRUD
接下来进行crud的编写,因没什么干货,就不贴代码了,可以到项目中看,主要使用RESTful
| 实验功能 | 请求URI | 请求方式 |
|---|---|---|
| 查询所有员工 | emps | GET |
| 来到添加页面 | emp | GET |
| 添加员工 | emp | POST |
| 查询某个员工(来到修改页面) | emp/1 | GET |
| 修改员工 | emp | PUT |
| 删除员工 | emp/1 | DELETE |
说一下主要的几个问题
5.4.1.常用的thymeleaf语法
1 | th:class="${activeUri=='dashboard'?'nav-link active':'nav-link'}" -- 设置class,如果activeUri这个参数为dashboard,即这个标签高亮 |
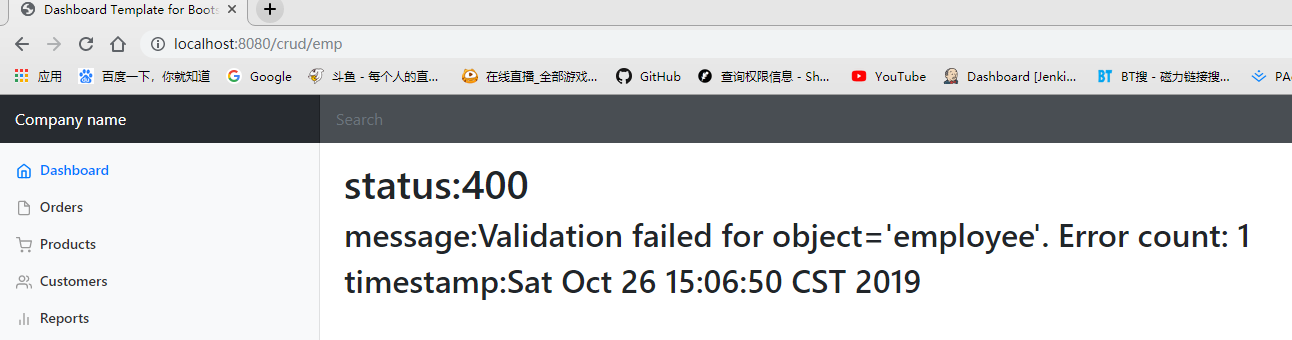
5.4.2.日期格式化
当提交form表单时,时期写为yyyy-MM-dd,出现400参数绑定异常,通过查找源码,发现默认日期格式为yyyy/mm/dd,如下
1 | public class WebMvcAutoConfiguration { |
所以我们想要使用yyyy-mm-dd需要在配置文件中修改才可以
1 | #application.properties |
5.4.3.PUT与DELETE提交表单
当提交表单时,因为只有get和post方法,所以应该做特殊处理
1 | <!--修改需要使用put方法 |
1 | public class HiddenHttpMethodFilter extends OncePerRequestFilter { |
六、错误处理
当我们请求的请求发出错误是,SpringBoot会自动进行错误处理,如404错误
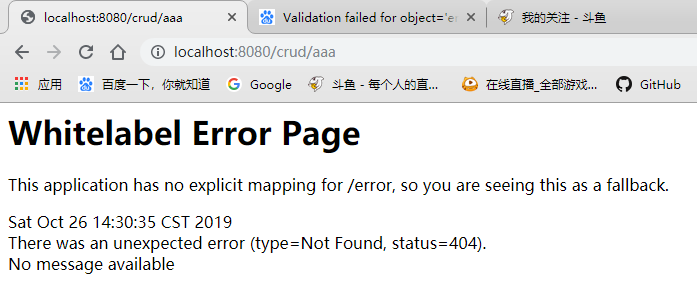 、
、
6.1.SpringBoot错误处理原理
这种错误处理机制,是由ErrorMvcAutoConfiguration配置类进行处理的:
1 | public class ErrorMvcAutoConfiguration { |
再其中有四个重要的组件:
- ErrorPageCustomizer:如果系统发生错误,获取配置文件错误路径,如果没有配置,默认请求
/error
1 |
|
- BasicErrorController:处理错误请求,如果没有配置默认处理
/error请求
1 | ("${server.error.path:${error.path:/error}}") |
- DefaultErrorViewResolver:决定请求哪个文件,默认对4xx与5xx与状态码.html做映射
1 | static { |
- DefaultErrorAttributes:默认的一些错误信息,存到域中
1 | errorAttributes.put("timestamp", new Date()); |
即:
ErrorPageCustomizer》BasicErrorController》DefaultErrorViewResolver》DefaultErrorAttributes
系统错误发出请求 》接受并进行客户端或浏览器请求处理 》决定返回哪个错误页面 》将错误信息存放域中
6.2.定制错误页面
经过上面的源码阅读,我们知道:
1)当有使用模板引擎时,我们可以将错误页面存放到/template/error/xxx.html,xxx为错误状态码
注意,DefaultErrorViewResolver也提供了4xx.html,5xx.html。即对于不确定的错误如果以4开头,5开头可以编写4xx.html来作为这些不确定状态码的错误页面
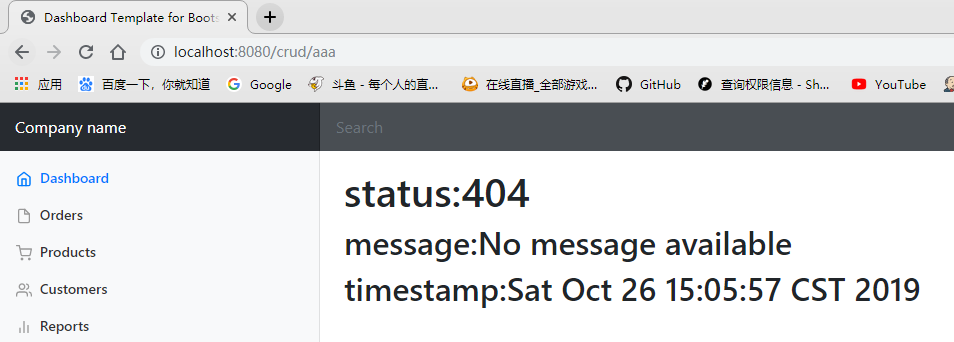

可以看到,对于400错误和404错误,都返回了自定义的页面,即验证了我们的想法
2)如果没有模板引擎,应该吧错误页面存放到静态资源下,会自动寻找
3)如果静态资源下也没找到自定义错误页面,Springboot会使用它自己默认的错误页面
6.3.定制错误数据
为了方便测试,我们先创一个自定义异常处理类:
1 | public class UserNotExistException extends RuntimeException { |
并在controller中抛出异常:
1 | ("hello") |
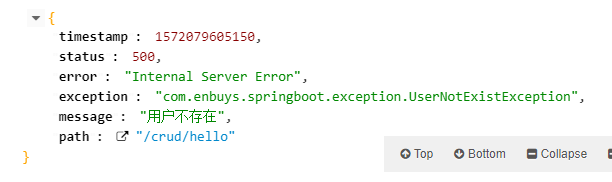
可以看到json数据是SpringBoot默认定制的,我想自己定制应该怎么做呢?
1)首先需要定制一个ExceptionHandler异常处理类,重写handleException方法,需要转发到/error中,让SpringBoot来进行异常处理
1 |
|
2)由上面BasicErrorController的源码知,不管是客户端还是浏览器请求,对返回信息的处理都是由getErrorAttributes()方法获取,即DefaultErrorAttributes存放默认的返回异常信息,如果我们想添加我们自己的一些信息,便需要重写他
1 | //给容器中加入我们自己定义的ErrorAttributes |
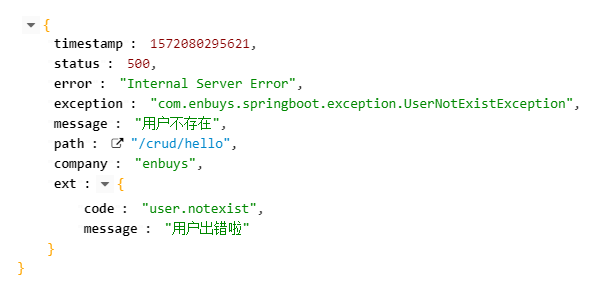
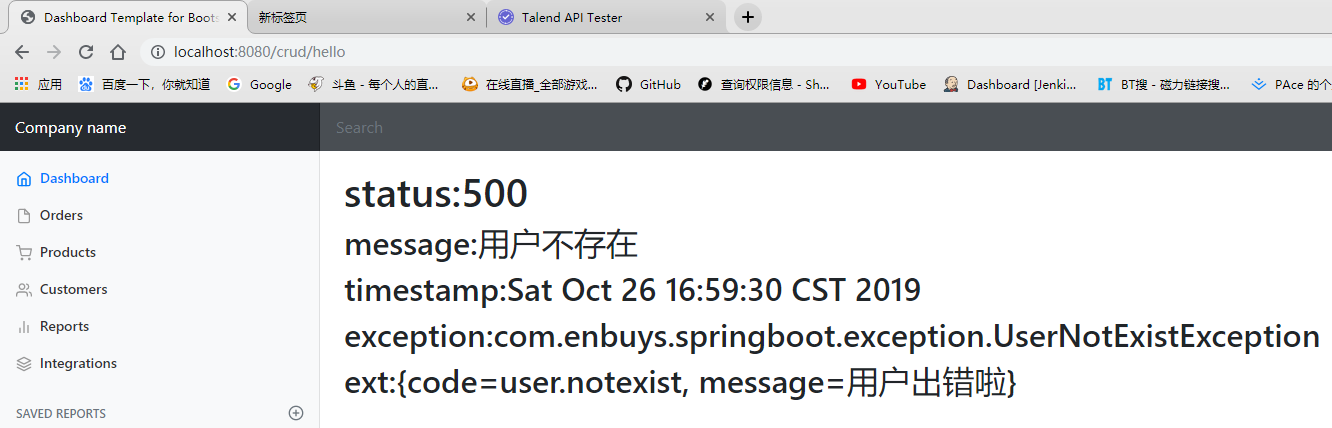
浏览器或客户端请求都可以正确响应出我们所需的信息
七、SpringBoot与Servlet
我们知道,SpringBoot使用jar包的方式运行,还能再浏览器访问,就是因为它使用了嵌入式的tomcat,而我们可以通过一些方法来修改默认的配置
7.1.修改Servlet配置
1 | (prefix = "server", ignoreUnknownFields = true) |
1.通过查看源码,可以发现Server配置有一个ServerProperties配置类,可以根据它来配一些属性
1 | =8081 |
2.还可以发现,ServerProperties实现了一个EmbeddedServletContainerCustomizer,即Servlet个性化类,我们也可以通过写一个类实现它,来进行一些配置
1 |
|
7.2.注册三大组件
由于SpringBoot默认是以jar包的方式启动嵌入式的Servlet容器来启动SpringBoot的web应用,没有web.xml文件。
注册三大组件用以下方式
ServletRegistrationBean
1 | //注册三大组件 |
FilterRegistrationBean
1 |
|
ServletListenerRegistrationBean
1 |
|
SpringBoot帮我们自动SpringMVC的时候,自动的注册SpringMVC的前端控制器;DIspatcherServlet;
DispatcherServletAutoConfiguration中:
1 | (name = DEFAULT_DISPATCHER_SERVLET_REGISTRATION_BEAN_NAME) |
7.3.替换其他嵌入式Servlet容器
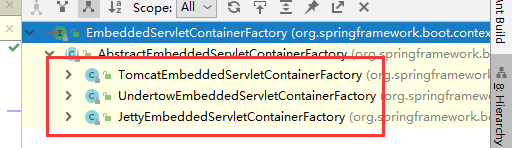
可以看到,除了tomcat,还具有undertow和jetty两个容器,默认为tomcat,可以通过修改pom文件的方式来引入其他两个
Tomcat:
1 | <dependency> |
Jetty:
1 | <!-- 引入web模块 --> |
Undertow:
1 | <!-- 引入web模块 --> |
7.4.容器自动配置原理
SpringBoot具有一个为Servlet容器自动配置的配置类EmbeddedServletContainerAutoConfiguration:
1 | (Ordered.HIGHEST_PRECEDENCE) |
1)@ConditionalOnClass({ Servlet.class, Tomcat.class }):Springboot通过判断是否存在三个容器的class来决定启用哪个容器
2)new TomcatEmbeddedServletContainerFactory():通过嵌入式容器工厂创建相应的Servlet容器
1 |
|
通过TomcatEmbeddedServletContainerFactory的源码,更能印证了对Tomcat的初始化启动
3)@Import(BeanPostProcessorsRegistrar.class):对容器初始化前后进行属性设置
BeanPostProcessorsRegistrar,进行了Bean的赋值,通过EmbeddedServletContainerCustomizerBeanPostProcessor的postProcessBeforeInitialization()方法对初始化前进行个性化配置
1 | // 初始化前 |
其中调用了postProcessBeforeInitialization()来进行初始化配置
1 | private void postProcessBeforeInitialization( |
可以看到,对每个容器进行了customize(bean),这个方法就是配置容器属性的,默认配置或个性化配置
1 |
|
步骤:
- SpringBoot根据导入的依赖情况,给容器中添加相应的EmbeddedServletContainerFactory【TomcatEmbeddedServletContainerFactory】
- 容器中某个组件要创建对象就会惊动后置处理器;EmbeddedServletContainerCustomizerBeanPostProcessor;
- 后置处理器,从容器中获取所有的EmbeddedServletContainerCustomizer,调用定制器的定制方法
7.5.容器启动原理
SpringBoot启动运行run
SpringApplication会执行AbstractApplicationContext的refresh方法,refresh是一个重要的注解开发方法,后面研究Spring注解时再详细研究,主要是刷新SpringIOC容器(创建IOC容器,初始化容器,进行属性配置,创建每个容器中的必要组件)
1
2
3
4
5
6
7
8
9
10
11
12
13
14
15
16
17
18
19
20
21
22
23
24
25
26
27
28
29
30
31
32
33
34
35
36
37
38
39
40
41
42
43
44
45
46
47
48
49
50
51
52
53
54
55
56
57
58
59
60
61
62
63
64
65public void refresh() throws BeansException, IllegalStateException {
synchronized (this.startupShutdownMonitor) {
// Prepare this context for refreshing.
prepareRefresh();
// Tell the subclass to refresh the internal bean factory.
ConfigurableListableBeanFactory beanFactory = obtainFreshBeanFactory();
// Prepare the bean factory for use in this context.
prepareBeanFactory(beanFactory);
try {
// Allows post-processing of the bean factory in context subclasses.
postProcessBeanFactory(beanFactory);
// Invoke factory processors registered as beans in the context.
invokeBeanFactoryPostProcessors(beanFactory);
// Register bean processors that intercept bean creation.
registerBeanPostProcessors(beanFactory);
// Initialize message source for this context.
initMessageSource();
// Initialize event multicaster for this context.
initApplicationEventMulticaster();
// Initialize other special beans in specific context subclasses.
onRefresh();
// Check for listener beans and register them.
registerListeners();
// Instantiate all remaining (non-lazy-init) singletons.
finishBeanFactoryInitialization(beanFactory);
// Last step: publish corresponding event.
finishRefresh();
}
catch (BeansException ex) {
if (logger.isWarnEnabled()) {
logger.warn("Exception encountered during context initialization - " +
"cancelling refresh attempt: " + ex);
}
// Destroy already created singletons to avoid dangling resources.
destroyBeans();
// Reset 'active' flag.
cancelRefresh(ex);
// Propagate exception to caller.
throw ex;
}
finally {
// Reset common introspection caches in Spring's core, since we
// might not ever need metadata for singleton beans anymore...
resetCommonCaches();
}
}
}refresh方法中onRefresh():web情况下的IOC重写了这个方法,会创建createEmbeddedServletContainer,Servlet容器
接下来就是我们上面7.4说的容器自动配置了,根据容器的时候创建TomcatEmbeddedServletContainerFactory或其他,然后惊动后置处理器,进行初始化前后的属性修改