10.SpringCloud Hystrix 源码分析

一、SpringCloud CircuitBreaker

首先我们从SpringCloud的官方断路器注解@EnableCircuitBreaker入手

@EnableCircuitBreake

1
2
3
4
5
6
7
8
@Target(ElementType.TYPE)
@Retention(RetentionPolicy.RUNTIME)
@Documented
@Inherited
@Import(EnableCircuitBreakerImportSelector.class)
public @interface EnableCircuitBreaker {

}

可以看到,真正有用的代码就是@Import那一行:

@Import(EnableCircuitBreakerImportSelector.class)

这里Import了一个选择器,是选择什么呢?就是这个断路器的实现类,即Hystrix

EnableCircuitBreakerImportSelector

1
2
3
4
5
6
7
8
9
10
11
@Order(Ordered.LOWEST_PRECEDENCE - 100)
public class EnableCircuitBreakerImportSelector extends
SpringFactoryImportSelector<EnableCircuitBreaker> {

@Override
protected boolean isEnabled() {
return new RelaxedPropertyResolver(getEnvironment()).getProperty(
"spring.cloud.circuit.breaker.enabled", Boolean.class, Boolean.TRUE);
}

}

进入到断路器导入选择器中,可以看到代码很少,主要有两个重点

  • 继承SpringFactoryImportSelector父类,并且泛型为EnableCircuitBreaker
  • 可以在配置文件中通过spring.cloud.circuit.breaker.enabled,进行断路器的开启和关闭

这样我们再进入SpringFactoryImportSelector

SpringFactoryImportSelector

1
2
3
4
5
6
7
8
9
10
11
12
13
14
15
16
17
18
19
20
21
22
23
24
25
26
27
28
29
30
31
32
33
34
35
36
37
38
39
40
41
42
43
44
45
46
47
48
49
@CommonsLog
public abstract class SpringFactoryImportSelector<T>
implements DeferredImportSelector, BeanClassLoaderAware, EnvironmentAware {

private ClassLoader beanClassLoader;

private Class<T> annotationClass;

private Environment environment;

@SuppressWarnings("unchecked")
protected SpringFactoryImportSelector() {
this.annotationClass = (Class<T>) GenericTypeResolver
.resolveTypeArgument(this.getClass(), SpringFactoryImportSelector.class);
}

@Override
public String[] selectImports(AnnotationMetadata metadata) {
if (!isEnabled()) {
return new String[0];
}
AnnotationAttributes attributes = AnnotationAttributes.fromMap(
metadata.getAnnotationAttributes(this.annotationClass.getName(), true));

Assert.notNull(attributes, "No " + getSimpleName() + " attributes found. Is "
+ metadata.getClassName() + " annotated with @" + getSimpleName() + "?");

// Find all possible auto configuration classes, filtering duplicates
List<String> factories = new ArrayList<>(new LinkedHashSet<>(SpringFactoriesLoader
.loadFactoryNames(this.annotationClass, this.beanClassLoader)));

if (factories.isEmpty() && !hasDefaultFactory()) {
throw new IllegalStateException("Annotation @" + getSimpleName()
+ " found, but there are no implementations. Did you forget to include a starter?");
}

if (factories.size() > 1) {
// there should only ever be one DiscoveryClient, but there might be more than
// one factory
log.warn("More than one implementation " + "of @" + getSimpleName()
+ " (now relying on @Conditionals to pick one): " + factories);
}

return factories.toArray(new String[factories.size()]);
}

···· // 一些代码省略

}

代码较多,我们一点一点看

构造方法

首先看他的构造方法

1
2
3
4
5
@SuppressWarnings("unchecked")
protected SpringFactoryImportSelector() {
this.annotationClass = (Class<T>) GenericTypeResolver
.resolveTypeArgument(this.getClass(), SpringFactoryImportSelector.class);
}

这里主要是将注解类进行实例化,其实现,就是刚刚的那个泛型EnableCircuitBreaker

selectImport

然后我们再看selectImport方法,这个方法主要目的就是选择一个类,为我们的断路器实现类

1
2
3
4
5
6
7
8
9
10
11
12
13
14
15
16
17
18
19
@Override
public String[] selectImports(AnnotationMetadata metadata) {
if (!isEnabled()) {
return new String[0];
}
// 获取注解类中的属性
AnnotationAttributes attributes = AnnotationAttributes.fromMap(
metadata.getAnnotationAttributes(this.annotationClass.getName(), true));

··· // 省略

// 从spring.factories中加载自动配置类
// Find all possible auto configuration classes, filtering duplicates
List<String> factories = new ArrayList<>(new LinkedHashSet<>(SpringFactoriesLoader
.loadFactoryNames(this.annotationClass, this.beanClassLoader)));

··· // 省略
return factories.toArray(new String[factories.size()]);
}
1.获取注解类中的属性
1
2
AnnotationAttributes attributes = AnnotationAttributes.fromMap(
metadata.getAnnotationAttributes(this.annotationClass.getName(), true));

这里代码的意思就是将注解类里的注解信息进行保存

因为EnableCircuitBreaker中是空的,属性对于他来说不明显,这里我们换个类来解析下,比如@EnableCaching

1
2
3
4
5
6
7
8
9
10
11
12
13
@Target(ElementType.TYPE)
@Retention(RetentionPolicy.RUNTIME)
@Documented
@Import(CachingConfigurationSelector.class)
public @interface EnableCaching {

boolean proxyTargetClass() default false;

AdviceMode mode() default AdviceMode.PROXY;

int order() default Ordered.LOWEST_PRECEDENCE;

}

这里可以看到有三个属性,对于AnnotationAttributes来说,是将这些属性保存在LinkedHashMap里的,其方法名为key,值为value,即proxyTargetClasskeyfalsevalue

2.从spring.factories中加载自动配置类
1
2
List<String> factories = new ArrayList<>(new LinkedHashSet<>(SpringFactoriesLoader
.loadFactoryNames(this.annotationClass, this.beanClassLoader)));

这里可以看到SpringFactoriesLoader,即从META-INF/spring.factories中加载名称叫this.annotationClass,即EnableCircuitBreaker的自动配置类,这里我们可以全局搜一下EnableCircuitBreaker

1575947807445

1575947827188

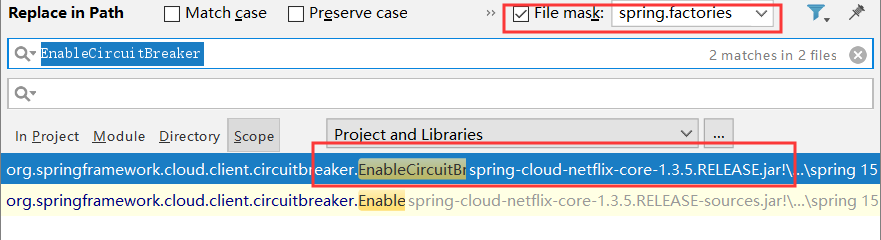
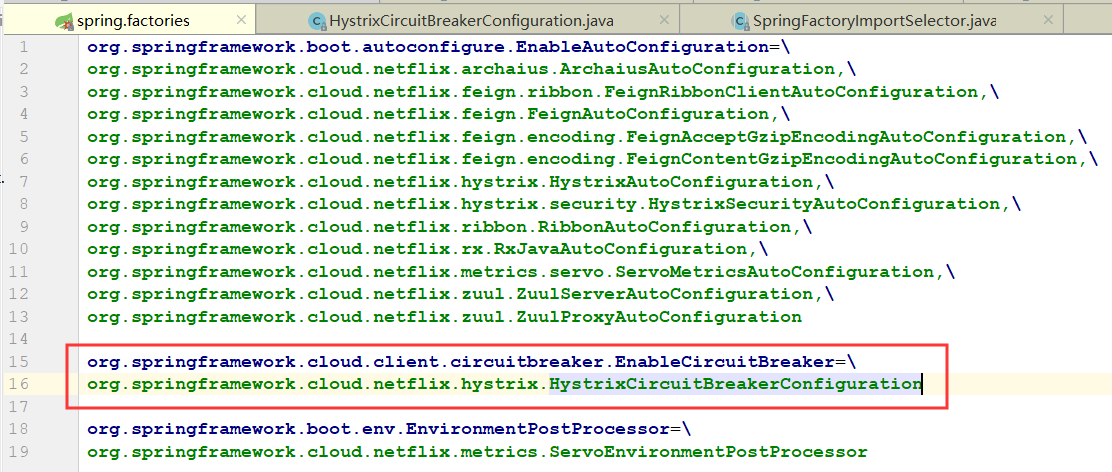
即会获取到HystrixCircuitBreakerConfiguration,这个自动配置类

3.返回数组
1
return factories.toArray(new String[factories.size()]);

将获取到的自动配置类集合转成数组返回

二、NetFlix Hystrix

我们接着HystrixCircuitBreakerConfiguration分析,因为接下来的源码都属于Hystrix包,所以另开了一个标题

HystrixCircuitBreakerConfiguration

在这个配置类中,有几个重要的组件

HystrixShutdownHook

1
2
3
4
5
6
7
8
9
private class HystrixShutdownHook implements DisposableBean {

@Override
public void destroy() throws Exception {
// Just call Hystrix to reset thread pool etc.
Hystrix.reset();
}

}

这个组件主要功能是在Hystrix shutdown的时候,做一些清理工作

HystrixWebConfiguration

1
2
3
4
5
6
7
8
9
10
11
12
13
14
15
16
@Configuration
@ConditionalOnProperty(value = "hystrix.stream.endpoint.enabled", matchIfMissing = true)
@ConditionalOnWebApplication
@ConditionalOnClass({ Endpoint.class, HystrixMetricsStreamServlet.class })
protected static class HystrixWebConfiguration {

@Bean
public HystrixStreamEndpoint hystrixStreamEndpoint() {
return new HystrixStreamEndpoint();
}

@Bean
public HasFeatures hystrixStreamFeature() {
return HasFeatures.namedFeature("Hystrix Stream Servlet", HystrixStreamEndpoint.class);
}
}

这个组件主要是开启Hystrix的Stream EndPoint,即可以访问/hystrix.stream来查看流信息,以及配合HystrixDashboard进行监控

HystrixMetricsPollerConfiguration

1
2
3
4
5
@Configuration
@ConditionalOnProperty(value = "hystrix.metrics.enabled", matchIfMissing = true)
@ConditionalOnClass({ HystrixMetricsPoller.class, GaugeService.class })
@EnableConfigurationProperties(HystrixMetricsProperties.class)
protected static class HystrixMetricsPollerConfiguration implements SmartLifecycle {

这个类是配置Hystrix的metrics指标,也不做过多介绍了

HystrixCommandAspect

Hystrix的命令切面,也是主要实现熔断的切面类,也是Hystrix最重要的类之一

1
2
3
4
5
6
7
8
9
10
11
12
@Aspect
public class HystrixCommandAspect {

@Pointcut("@annotation(com.netflix.hystrix.contrib.javanica.annotation.HystrixCommand)")
public void hystrixCommandAnnotationPointcut() {
}

@Pointcut("@annotation(com.netflix.hystrix.contrib.javanica.annotation.HystrixCollapser)")
public void hystrixCollapserAnnotationPointcut() {
}

}

在这个类中,首先可以看到两个切点

  • HystrixCommand:我们常用的配置熔断的注解
  • HystrixCollapser:批量熔断的一个注解,不常用

接着往下看重要的方法methodsAnnotatedWithHystrixCommand()

1
2
3
4
5
6
7
8
9
10
11
12
13
14
15
16
17
18
19
20
21
22
23
24
25
26
27
28
@Around("hystrixCommandAnnotationPointcut() || hystrixCollapserAnnotationPointcut()")
public Object methodsAnnotatedWithHystrixCommand(final ProceedingJoinPoint joinPoint) throws Throwable {
Method method = getMethodFromTarget(joinPoint);
Validate.notNull(method, "failed to get method from joinPoint: %s", joinPoint);
if (method.isAnnotationPresent(HystrixCommand.class) && method.isAnnotationPresent(HystrixCollapser.class)) {
throw new IllegalStateException("method cannot be annotated with HystrixCommand and HystrixCollapser " +
"annotations at the same time");
}
MetaHolderFactory metaHolderFactory = META_HOLDER_FACTORY_MAP.get(HystrixPointcutType.of(method));
MetaHolder metaHolder = metaHolderFactory.create(joinPoint);
HystrixInvokable invokable = HystrixCommandFactory.getInstance().create(metaHolder);
ExecutionType executionType = metaHolder.isCollapserAnnotationPresent() ?
metaHolder.getCollapserExecutionType() : metaHolder.getExecutionType();

Object result;
try {
if (!metaHolder.isObservable()) {
result = CommandExecutor.execute(invokable, executionType, metaHolder);
} else {
result = executeObservable(invokable, executionType, metaHolder);
}
} catch (HystrixBadRequestException e) {
throw e.getCause() != null ? e.getCause() : e;
} catch (HystrixRuntimeException e) {
throw hystrixRuntimeExceptionToThrowable(metaHolder, e);
}
return result;
}

我们一步步的分析:

切点拦截
1
@Around("hystrixCommandAnnotationPointcut() || hystrixCollapserAnnotationPointcut()")

这里,第一眼可以看到@Around中添加了上面所说的那两个切点,所以,当有方法添加了这两个注解时,便会被这个切面类拦截。

Method信息保存
1
Method method = getMethodFromTarget(joinPoint);

接着来到了这个方法,是获取被拦截方法的信息,保存到Method中。

MetaHolderFactory的初始化
1
MetaHolderFactory metaHolderFactory = META_HOLDER_FACTORY_MAP.get(HystrixPointcutType.of(method));

再接着,是根据这个方法的Hystrix注解,判断是@HystrixCommand还是@HystrixCollapser来进行MetaHolderFactory的初始化,这里debug查看一下:

1575961756881

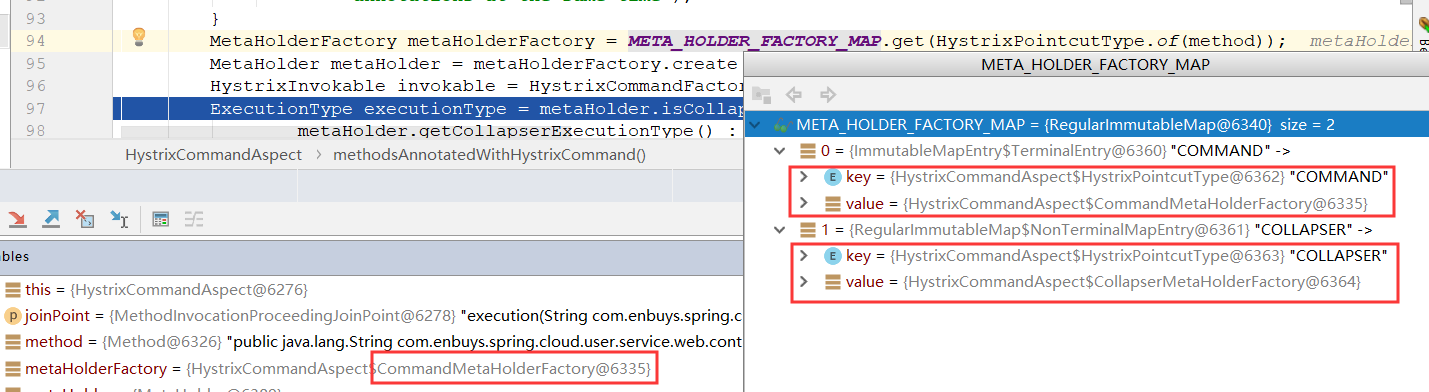
这里可以清楚的看到,因为方法上我们添加的是@HystrixCommand,所以工厂的实现是CommandMetaHolderFactory

MetaHolder的实例化
1
MetaHolder metaHolder = metaHolderFactory.create(joinPoint);

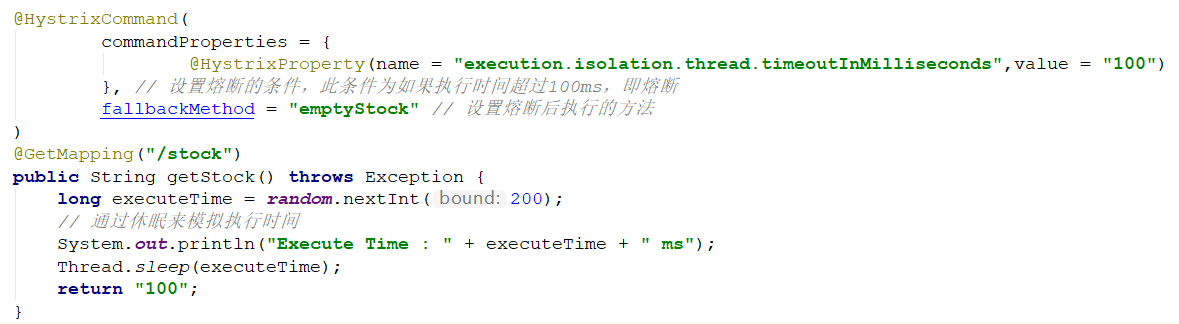
这里可以看到,通过工厂创建了一个MetaHolder对象,对于此对象,保存的是方法信息,熔断设置等等。

比如方法名,返回值类型,熔断条件,fallback方法等,其实就是我们在那个类上设置的信息:

1575962054823

HystrixInvokable的实例化
1
HystrixInvokable invokable = HystrixCommandFactory.getInstance().create(metaHolder);

HystrixInvokable看名字,可以猜到是Hystrix熔断的可执行器,它本身是一个空方法,主要实现还是由下面的初始化来进行选择。

1
2
3
4
5
6
7
8
9
10
11
public HystrixInvokable create(MetaHolder metaHolder) {
HystrixInvokable executable;
if (metaHolder.isCollapserAnnotationPresent()) {
executable = new CommandCollapser(metaHolder);
} else if (metaHolder.isObservable()) {
executable = new GenericObservableCommand(HystrixCommandBuilderFactory.getInstance().create(metaHolder));
} else {
executable = new GenericCommand(HystrixCommandBuilderFactory.getInstance().create(metaHolder));
}
return executable;
}

这里有三个判断

  • 对于Collasper注解的使用CommandCollapser实现
  • 对于实现了isObservable,观察者模式的,使用GenericObservableCommand实现(属于RxJava的东西)
  • 其他情况,即普通情况,使用GenericCommand,也是最常用的实现方法

所以,实际实现是由GenericCommand实现

这个类也很简单,就是对executefallback方法的执行做了实现,主要使用的是==反射==

方法的执行

最终来到最重要的一步,拦截方法的执行

1
result = CommandExecutor.execute(invokable, executionType, metaHolder);

进一步跟进

1
2
3
4
5
6
7
8
9
10
11
12
13
14
15
16
17
18
19
20
21
22
23
24
public static Object execute(HystrixInvokable invokable, ExecutionType executionType, MetaHolder metaHolder) throws RuntimeException {
Validate.notNull(invokable);
Validate.notNull(metaHolder);

switch (executionType) {
case SYNCHRONOUS: {
return castToExecutable(invokable, executionType).execute();
}
case ASYNCHRONOUS: {
HystrixExecutable executable = castToExecutable(invokable, executionType);
if (metaHolder.hasFallbackMethodCommand()
&& ExecutionType.ASYNCHRONOUS == metaHolder.getFallbackExecutionType()) {
return new FutureDecorator(executable.queue());
}
return executable.queue();
}
case OBSERVABLE: {
HystrixObservable observable = castToObservable(invokable);
return ObservableExecutionMode.EAGER == metaHolder.getObservableExecutionMode() ? observable.observe() : observable.toObservable();
}
default:
throw new RuntimeException("unsupported execution type: " + executionType);
}
}

这里可以看到,会判断是异步,同步 或者观察者模式的,进行不同的实现

常用的还是异步,即castToExecutable()方法,把HystrixInvokable转成HystrixExecutable,进而使用HystrixCommandexecute方法执行。

这里就不往下跟进了,实际就是使用了Future,异步多线程执行方法,也是在这里判断是否需要熔断的,真正触发的调用还是由GenericCommand完成。

总结
  1. 拦截标注 @HystrixCommand@HystrixCollapser 的方法(@Around
  2. 生成拦截⽅方法原信息,通过MetaHolderFactory,对于不同的注解CommandCollasper,使用的工厂不同
  3. 生成 HystrixInvokable,通过HystrixCommandFactory,通过情况下由GenericCommand实现
  4. 执行方法,判断异步,同步或观察者模式,进行不同的转换
  5. 通过情况下,把HystrixInvokable转成HystrixExecutable,进而使用HystrixCommandexecute方法执行。
  6. 最后通过Future异步执行,判断是否需要熔断,最终方法的调用或者fallback方法的调用是由GenericCommand完成